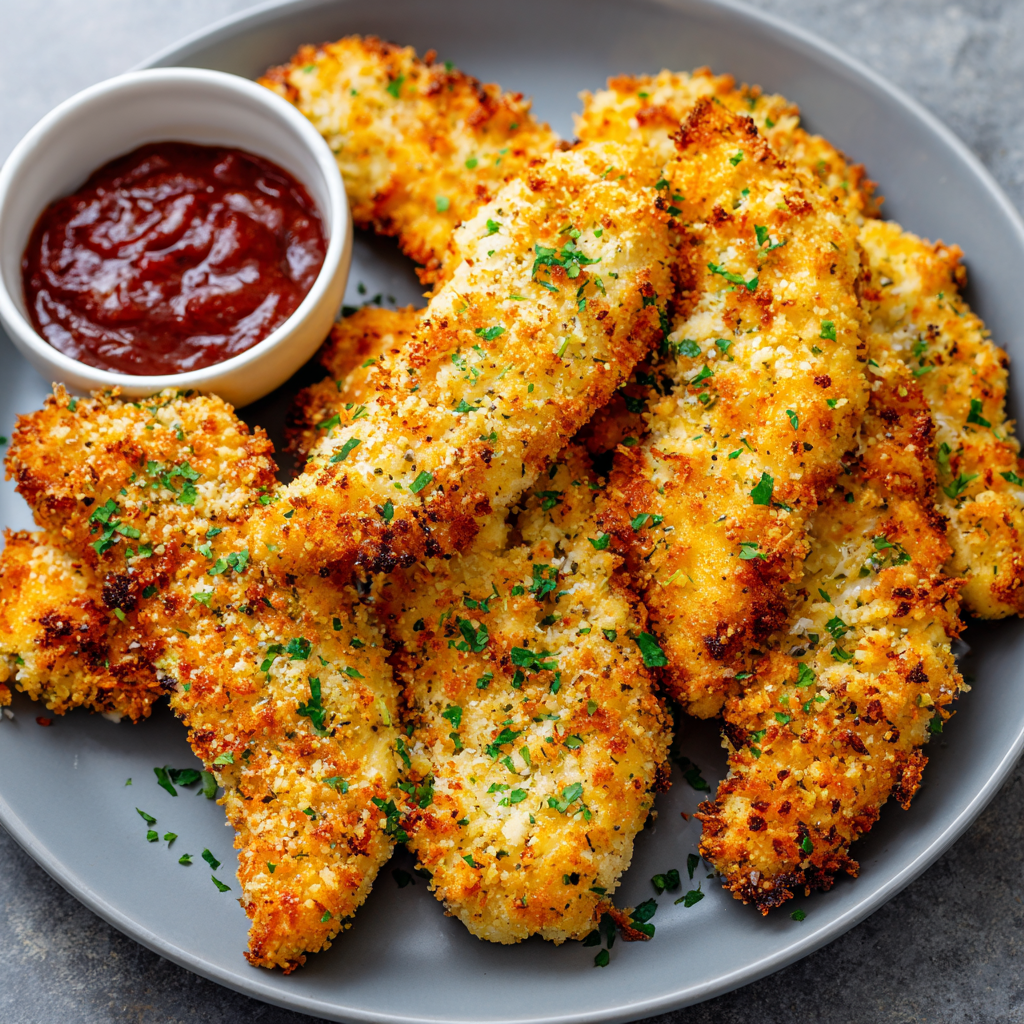
The Ultimate Guide to Irresistibly Crispy Baked Chicken Tenders: A Healthier Family Favorite
There’s a universal truth in the world of food: everyone loves chicken tenders. That golden, crispy exterior giving way to a tender, juicy interior is a texture and flavor combination that’s nearly impossible to resist. But for those of us seeking a healthier lifestyle, the deep-fried version from restaurants or the freezer aisle often comes with a side of guilt. What if I told you that you could achieve that same satisfying crunch, that same juicy perfection, right in your own oven, with a fraction of the oil and all of the flavor? Welcome to your new culinary staple: the perfect Crispy Baked Chicken Tenders.
This isn’t just another recipe; it’s a deep dive into the art and science of creating the ultimate baked chicken tender. We’ll explore why this method works so well, the secrets to an unbeatable crunch, how to customize them to your heart’s content, and why this recipe will become a weekly fixture on your dinner table. Forget everything you thought you knew about “healthy” baked chicken being bland or soggy. We’re about to change the game.
More breakfast ideas you’ll love
Why You Need This Recipe in Your Life
Before we get to the ingredients and instructions, let’s talk about the “why.” Why are these Crispy Baked Chicken Tenders such a game-changer?
-
Healthier, Not Heavier: By baking instead of deep-frying, you significantly cut down on calories and unhealthy fats. A typical fried chicken tender can absorb tablespoons of oil, while our baked version uses a light spritz, making it a choice you can feel good about.
-
The Weeknight Hero: With a total time of just 30 minutes from prep to plate, this recipe is a lifesaver on busy evenings. It’s straightforward, uses simple ingredients, and is virtually foolproof.
-
Meal Prep Marvel: These tenders reheat beautifully, making them perfect for packing in lunches, chopping over salads, or having as a ready-to-eat protein for the week.
-
A Canvas for Flavor: The basic recipe is a masterpiece on its own, but it’s also incredibly adaptable. From spicy Cajun to herby Italian, you can take these Crispy Baked Chicken Tenders on a global flavor journey anytime you like.
-
Family-Friendly Magic: Picky eaters? This is your secret weapon. Kids (and adults) adore them, and involving the little ones in the breading process can be a fun family activity.
Deconstructing the Perfect Crispy Baked Chicken Tender: The Ingredients
The magic of this recipe lies in the simplicity and quality of its components. Each ingredient plays a specific role in building that perfect texture and flavor.
For the Chicken:
-
1 lb chicken breasts or chicken tenders: You have two great options here. Using pre-cut “tenders” (the tenderloin of the chicken) is a time-saver, and they are naturally tender. Chicken breasts, cut into 1-inch wide strips, work just as well and are often more economical. The key is to cut them into uniform sizes to ensure even cooking.
For the Breading Station – The Foundation of Crunch:
The breading station is a two-step process that creates a glue (the egg) and a crust (the breadcrumb mixture).
-
2 large eggs, beaten: This is our binding agent. The beaten egg helps the dry breading mixture adhere to the chicken, creating a solid layer that will crisp up in the oven.
-
1 cup panko breadcrumbs: This is the star of the crunch. Panko is a Japanese-style breadcrumb that is coarser and airier than traditional fine breadcrumbs. This structure creates a lighter, crispier, and less dense coating that doesn’t get soggy as easily. For the crispiest results, panko is non-negotiable.
-
½ cup grated Parmesan cheese (optional but highly recommended): The “secret ingredient” for many. Parmesan adds a deep, savory, umami flavor that elevates the tenders from great to extraordinary. It also helps the crust brown beautifully and adds to the crispy texture.
The Flavor Arsenal – The Seasoning Blend:
This is where you can truly make the recipe your own. Our base blend is a classic crowd-pleaser.
-
1 tsp garlic powder: Provides a robust, savory backbone.
-
1 tsp paprika: Adds a mild sweetness and a beautiful red hue that contributes to the golden-brown color. For a smoky twist, use smoked paprika.
-
½ tsp onion powder: Complements the garlic with a sweeter, allium flavor.
-
½ tsp salt: Essential for enhancing all the other flavors.
-
¼ tsp black pepper: Adds a slight, sharp heat.
The Crispiness Catalyst:
-
Olive oil spray: A light but thorough spritz of oil is the final touch. It mimics the effect of frying by helping the panko breadcrumbs brown and crisp up perfectly in the hot oven. You can use any neutral oil spray like avocado or canola.
The Step-by-Step Guide to Perfection: How to Make Crispy Baked Chicken Tenders
Follow these steps closely, and you will be rewarded with the best Crispy Baked Chicken Tenders of your life.
Step 1: Prep the Chicken.
If you’re using chicken breasts, place them on a cutting board and slice them into 1-inch wide strips. Try to make them as even as possible. Pat the chicken tenders dry with a paper towel. This is a small but crucial step—a dry surface helps the egg wash stick better. Season the strips lightly with a pinch of salt and pepper.
Step 2: Set Up Your Breading Assembly Line.
Organization is key here. You’ll need three stations in a row: 1) your plate of prepared chicken, 2) a shallow bowl with the beaten eggs, and 3) a second shallow bowl with the panko breadcrumbs, Parmesan cheese, garlic powder, paprika, onion powder, salt, and pepper, all mixed together thoroughly. This “mise en place” makes the breading process fast and clean.
Step 3: The Breading Technique.
Now for the fun part. Using one hand for wet ingredients and one for dry will keep your fingers from becoming a breaded mess.
-
Pick up a chicken strip with your “wet” hand and dip it completely into the beaten egg. Let any excess drip off.
-
Transfer the eggy chicken to the breadcrumb mixture. With your “dry” hand, scoop the crumbs over the chicken, pressing down gently but firmly. This pressing action is the secret to a thick, cohesive crust that won’t fall off. Ensure every nook and cranny is covered.
-
Pro-Tip for Extra Crunch: For an even thicker, crunchier coating, do a double-dip. After the first breading, dip the tender back into the egg and then into the breadcrumbs for a second layer.
Step 4: Prepare the Baking Sheet for Maximum Crispiness.
This is perhaps the most important step for achieving true crispiness. Do NOT just place the tenders on a bare baking sheet.
-
Line a baking sheet with parchment paper or a silicone baking mat for easy cleanup.
-
THE WIRE RACK TRICK: Place a wire cooling rack on top of the lined baking sheet. Arranging the Crispy Baked Chicken Tenders on the wire rack is a game-changer. It allows hot air to circulate around the entire tender, cooking it evenly and preventing the bottom from steaming and becoming soft. This single step ensures an all-around crispy crust.
Step 5: Bake to Golden-Brown Perfection.
-
Preheat your oven to a hot 400°F (200°C). A properly preheated oven is essential for the initial “sizzle” that sets the crust.
-
Arrange the breaded tenders on the wire rack, leaving a little space between each one so they can crisp up individually.
-
Spray the tops of the tenders generously with olive oil spray. This will make them brown and crisp.
-
Bake for 10-12 minutes, then carefully flip each tender. Spray the second side with oil spray and bake for another 10-12 minutes.
-
The tenders are done when they are a deep golden brown and the internal temperature reads 165°F (74°C) on an instant-read thermometer. Do not skip the thermometer—it’s the only way to guarantee juicy, perfectly cooked chicken without overcooking.
Step 6: Serve and Enjoy!
Let the tenders rest for a couple of minutes after pulling them from the oven. This allows the juices to redistribute throughout the chicken. Then, serve immediately with your favorite dipping sauces.
Beyond the Basic: Customizing Your Crispy Baked Chicken Tenders
The basic recipe is a 10/10, but the fun doesn’t stop there. Here are some ways to customize your tenders:
-
Spicy Kick: Add ½ tsp of cayenne pepper, chipotle powder, or a tablespoon of your favorite hot sauce to the egg wash.
-
Herbaceous Delight: Mix in 2 tablespoons of dried herbs like Italian seasoning, oregano, or thyme into the breadcrumb mixture.
-
“Everything Bagel” Style: Replace the seasoning blend with 2 tablespoons of everything bagel seasoning for a trendy, savory twist.
-
Gluten-Free: Use gluten-free panko breadcrumbs. The method remains exactly the same.
-
Dairy-Free: Simply omit the Parmesan cheese. The tenders will still be wonderfully crispy, though you may want to add a bit more salt and seasoning to compensate.
Serving Suggestions: More Than Just a Dipping Sauce
While these Crispy Baked Chicken Tenders are phenomenal with classic honey mustard, BBQ sauce, or ranch, they can be the star of countless meals.
-
The Classic Plate: Serve with a side of crispy oven-baked fries (or sweet potato fries) and coleslaw.
-
Salad Topper: Slice them and lay them over a fresh garden salad for a protein-packed lunch. A Caesar salad is a natural pairing.
-
Wrap or Sandwich: Tuck a few tenders into a warm pita or tortilla with lettuce, tomato, and a drizzle of sauce for a quick and easy wrap.
-
Pasta Partner: Serve them alongside a heaping bowl of macaroni and cheese or pasta with marinara sauce for the ultimate comfort food dinner.
The Ultimate Guide to Irresistibly Crispy Baked Chicken Tenders: A Healthier Family Favorite

Homemade baked chicken tenders are the perfect balance of crispy, golden coating and juicy, tender chicken—all without deep-frying. They’re fast, kid-friendly, and great for weeknight dinners or meal prep. With just a few pantry ingredients, you’ll have a healthier version of a classic favorite!
Ingredients
-
1 lb chicken breasts or chicken tenders, cut into strips
-
2 large eggs, beaten
-
1 cup panko or regular breadcrumbs
-
½ cup grated Parmesan cheese (optional, for extra flavor)
-
1 tsp garlic powder
-
1 tsp paprika
-
½ tsp onion powder
-
½ tsp salt
-
¼ tsp black pepper
-
Olive oil spray
Instructions
1. Prep the Chicken
-
If using chicken breasts, slice them into 1-inch-wide strips.
-
If using chicken tenders, leave them as-is.
2. Prepare the Breading Stations
-
In one bowl: beat the eggs.
-
In another: mix breadcrumbs, Parmesan, garlic powder, paprika, onion powder, salt, and pepper.
3. Season the Chicken
-
Lightly season the chicken strips with a pinch of salt and pepper.
4. Bread the Chicken
-
Dip each strip into the egg, letting excess drip off.
-
Coat in the breadcrumb mixture, pressing gently so it sticks.
-
For extra crunch, repeat the egg + breadcrumb step (double coat).
5. Prepare the Baking Sheet
-
Line a baking sheet with parchment or a silicone mat.
-
Optional: place a wire rack on top for even crisping.
6. Arrange and Bake
-
Place chicken strips on the sheet, spaced out.
-
Spray lightly with olive oil.
-
Bake at 400°F (200°C) for 20–25 minutes, flipping halfway.
-
Ensure internal temperature reaches 165°F (74°C).
7. Serve
-
Let rest for 2–3 minutes, then enjoy with dips like ranch, honey mustard, or BBQ sauce!
Notes
-
Use panko breadcrumbs for maximum crunch.
-
Don’t overcrowd the baking sheet—space allows proper browning.
-
Use a wire rack if you have one; it helps crisp the bottom.
-
Double-coat for an ultra-crispy crust.
-
Add Parmesan for a richer, more flavorful breading.
Final Thoughts
In the quest for meals that are both delicious and nourishing, it’s easy to feel like you have to make compromises. We’re often led to believe that “healthy” means sacrificing flavor, texture, or the simple joy of a comforting meal. This recipe for Crispy Baked Chicken Tenders shatters that notion entirely. It is a triumphant proof that with the right technique—a flavorful, Parmesan-spiked panko crust, the crucial use of a wire rack, and a hot oven—you can create something that is not just a “healthier alternative,” but a genuinely superior dish in its own right.
It’s a recipe that does more than just fill bellies; it brings people together. It’s the satisfaction of creating a crispy, golden crust with your own hands, the happy silence that falls over the dinner table as everyone digs in, and the peace of mind that comes from knowing exactly what went into the food you’re serving your loved ones. It’s versatile, reliable, and consistently delicious. So, print this recipe, pin it to your board, and get ready to make it again and again. You haven’t just learned how to bake chicken; you’ve mastered the art of the perfect Crispy Baked Chicken Tender.