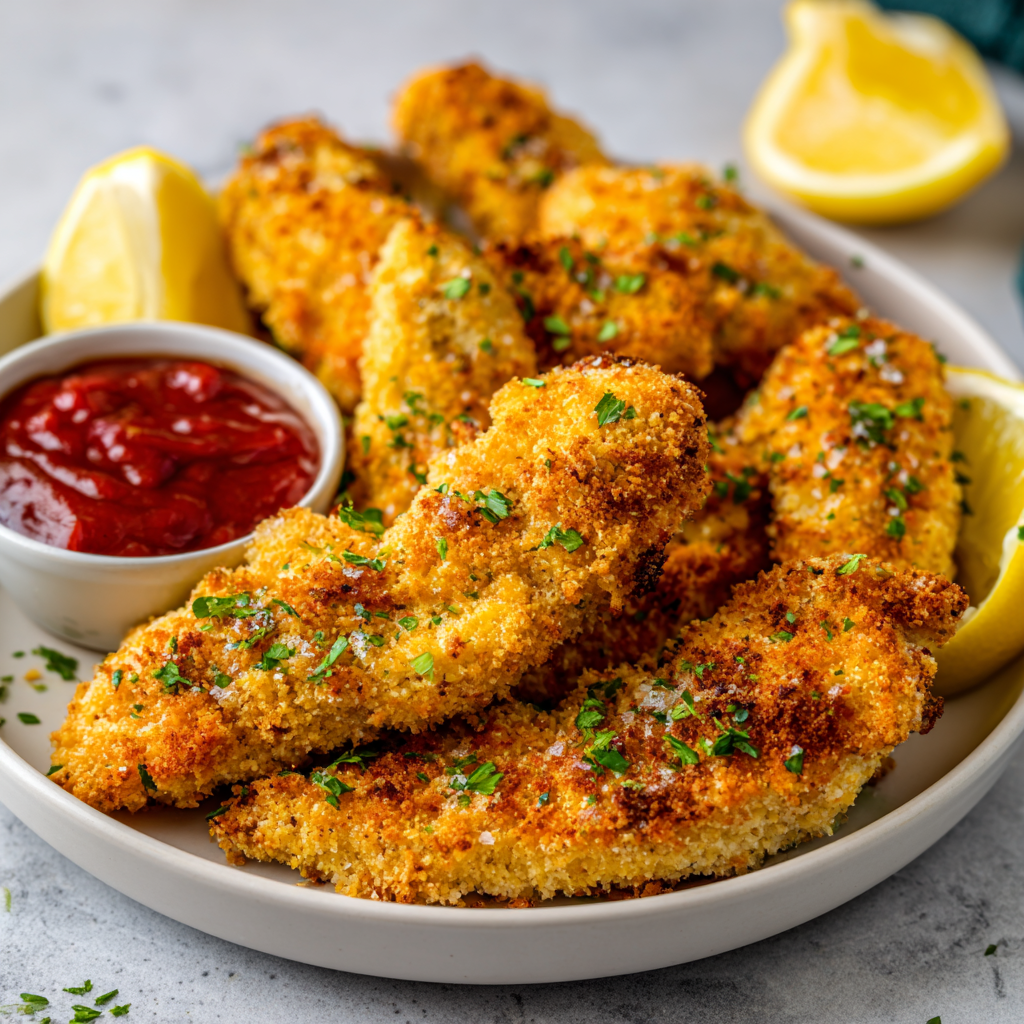
The Ultimate Guide to Irresistibly Crispy Baked Chicken Tenders
There’s a universal truth in the world of food: everyone loves chicken tenders. That golden, crispy exterior giving way to a tender, juicy interior is a textural symphony that appeals to kids and gourmands alike. But let’s be honest, the deep-fried version, while delicious, often comes with a side of guilt. What if you could achieve that same satisfying crunch, that same juicy bite, without the vat of oil? You can. Welcome to the holy grail of weeknight dinners and healthy meal prep: the perfect Crispy Baked Chicken Tenders.
This isn’t just another recipe; it’s a deep dive into the science and technique behind achieving maximum crispiness in your oven. We’re moving beyond a simple list of ingredients and into the realm of why these methods work, ensuring that every batch you make will be a resounding success. Forget the freezer aisle and the greasy takeout box. Your new favorite, foolproof path to a healthier, homemade version of this classic comfort food starts right here.
More breakfast ideas you’ll love
Why You Need This Recipe in Your Life
Before we get to the “how,” let’s talk about the “why.” This recipe for Crispy Baked Chicken Tenders is a game-changer for several reasons:
-
Healthier Choice: By baking instead of deep-frying, you significantly cut down on calories and unhealthy fats. You control the quality of ingredients, avoiding the preservatives and excessive sodium often found in pre-made or restaurant versions.
-
Unbeatable Convenience: With a total time of just 30 minutes from prep to plate, this recipe is faster than waiting for delivery and simpler than you might think. It’s a lifesaver on busy weeknights.
-
Incredibly Versatile: These tenders are a blank canvas. They can be the star of the main course, sliced atop a salad, stuffed into a wrap, or packed cold in a lunchbox. Their appeal is limitless.
-
Family-Friendly & Crowd-Pleasing: Picky eater at the table? It’s a rare soul who turns down a perfectly crispy chicken tender. This is a meal that will bring everyone together without any complaints.
-
Meal Prep Champion: Cook a large batch on Sunday, and you have a high-protein component ready for quick lunches and dinners throughout the week.
The Anatomy of a Perfect Crispy Baked Chicken Tender
Achieving that elusive, shatteringly crisp coating in a dry oven environment requires a bit of strategy. It all comes down to three key elements: the chicken itself, the breading station, and the baking technique.
Part 1: The Chicken – The Foundation
Choosing Your Cut:
-
Chicken Tenders: These are the naturally occurring strips attached to the underside of the breast. They are the ideal choice as they are already a perfect, uniform size and incredibly tender. No trimming is needed.
-
Chicken Breasts: A fantastic and often more economical option. The key is to cut them correctly. Slice larger breasts horizontally into 1-inch wide strips. To ensure even cooking, try to make all strips as uniform in size as possible. You can also gently pound them to an even thickness.
The Secret to Juicy Chicken:
The dreaded dry chicken tender is a tragedy we can avoid. The secret lies in two simple steps:
-
Bring to Room Temperature: Take your chicken out of the fridge 15-20 minutes before cooking. This allows for more even cooking, preventing a burnt outside and a raw inside.
-
The Brine (Optional but Recommended): For the juiciest chicken imaginable, consider a quick brine. Soak your tenders in a mixture of 1 cup warm water and 1 tablespoon of salt for 15-30 minutes before patting them completely dry. This seasons the meat from the inside out and helps it retain moisture during the high-heat baking process.
Part 2: The Breading Station – The Architecture of Crunch
This is where the magic happens. A well-executed breading station is the difference between a crispy crust and a sad, soggy coating.
The Breading Station Setup:
You will need three separate stations in a row for an efficient assembly line:
-
Station 1: The Chicken. Pat it completely dry with paper towels. This is non-negotiable! Moisture is the enemy of crispiness, and a dry surface is essential for the breading to adhere.
-
Station 2: The Binder. In a shallow bowl, beat 2 large eggs until smooth. Some recipes use buttermilk or yogurt for a tangier flavor and tenderizing effect, but eggs provide a reliable, neutral, and strong-binding layer.
-
Station 3: The Crunch. This is your dry mixture. For the ultimate Crispy Baked Chicken Tenders, we use a combination of:
-
Panko Breadcrumbs: These are the undisputed champion of crispy coatings. Panko is made from crustless bread, resulting in larger, flakier, airier crumbs than traditional fine breadcrumbs. They don’t absorb as much oil and create a lighter, crunchier texture that holds up beautifully in the oven.
-
Grated Parmesan Cheese: This is our secret weapon. The Parmesan adds a deep, savory, umami flavor that is simply irresistible. But it also serves a functional purpose: the cheese melts and crisps up in the oven, adding an extra layer of texture and helping the entire crust become more rigid and golden brown.
-
The Seasoning Squadron: Garlic powder, paprika (smoked paprika is a fantastic variation!), onion powder, salt, and black pepper. This blend creates a classic, universally loved flavor profile.
-
The Breading Technique:
-
Season the dry chicken strips lightly with a pinch of salt and pepper.
-
Using one hand for wet ingredients and one for dry, dip a chicken tender into the beaten egg. Let the excess drip off completely. Too much egg will create a gloopy layer under the breadcrumbs.
-
Transfer the tender to the panko mixture. Use your dry hand to scoop the crumbs over the top, pressing down gently but firmly. This “press” is crucial—it ensures the crumbs adhere and form a solid, unified crust that won’t fall off after baking.
-
Place the perfectly breaded tender on a clean plate and repeat.
Pro-Tip: The Double Dip. For an extra-thick, shaggy, and incredibly crunchy coating reminiscent of a certain popular chain, try a double coat. After the first dip in egg and panko, repeat the process—back into the egg, and then into the breadcrumbs for a second time. This creates a formidable crust that bakes up into pure crunch.
Part 3: The Baking Technique – The Transformation
This is the final, critical stage where we turn our prepared tenders into golden perfection.
The Baking Sheet Setup:
-
The Wire Rack Method (Highly Recommended): This is the single best thing you can do for evenly crispy Crispy Baked Chicken Tenders. Place a wire rack on top of your baking sheet. By elevating the chicken, hot air can circulate all the way around the tender. This means the bottom steams less and crisps up just as well as the top. No more soggy bottoms!
-
The Parchment Paper Method: If you don’t have a wire rack, parchment paper or a silicone baking mat is your next best bet. It prevents sticking and allows for easy cleanup, though the bottom may not get quite as crisp.
The Role of Oil:
While we’re baking, a small amount of fat is still essential for browning and crisping. A light but thorough spray of olive oil spray (or any neutral oil spray) over the top of the breaded tenders is the final touch. This mimics the effect of frying, helping the panko brown and become delectably crisp.
Baking to Perfection:
-
Preheat Your Oven: A properly preheated oven at 400°F (200°C) is non-negotiable. A cold oven will start to steam the chicken rather than sear it.
-
Don’t Crowd the Pan: Leave space between each tender. Crowding creates steam, which is the arch-nemesis of crispiness.
-
The Flip: Halfway through the baking time (about 10-12 minutes in), flip each tender. This ensures even browning and crispiness on both sides.
-
The Final Test: Bake for 20-25 minutes total, until the coating is a deep, golden brown. The only way to be 100% sure the chicken is done is to use a meat thermometer. Insert it into the thickest part of a tender—it should read 165°F (74°C). At this temperature, the chicken is perfectly safe to eat and will be incredibly juicy.
The Recipe: Perfect Crispy Baked Chicken Tenders
This is the consolidated, easy-to-follow recipe that puts all the techniques above into action.
Prep Time: 10 minutes
Cook Time: 20 minutes
Total Time: 30 minutes
Course: Main Course
Cuisine: American
Servings: 4
Calories: 375 kcal
Ingredients
-
1 lb chicken breasts or chicken tenders, cut into strips
-
2 large eggs, beaten
-
1 cup panko breadcrumbs
-
½ cup grated Parmesan cheese
-
1 tsp garlic powder
-
1 tsp paprika
-
½ tsp onion powder
-
½ tsp salt
-
¼ tsp black pepper
-
Olive oil spray, for coating
Instructions
-
Prep the Chicken: If using chicken breasts, cut them into 1-inch wide strips. Pat all chicken pieces completely dry with paper towels.
-
Preheat and Prepare: Preheat your oven to 400°F (200°C). Line a baking sheet with parchment paper and place a wire rack on top. If you don’t have a rack, just use the parchment paper.
-
Prepare the Breading Stations: In one shallow bowl, beat the eggs until smooth. In a second shallow bowl, combine the panko breadcrumbs, grated Parmesan cheese, garlic powder, paprika, onion powder, salt, and black pepper. Mix well.
-
Bread the Chicken: Working with one piece at a time, dip the chicken into the beaten egg, allowing the excess to drip off. Then, place it in the panko mixture, pressing firmly to coat on all sides. Transfer the breaded tender to the prepared wire rack or baking sheet. Repeat with the remaining chicken.
-
Bake: Lightly spray the top of all the breaded chicken tenders with olive oil spray. Bake for 10-12 minutes, then carefully flip each tender. Spray the second side lightly with oil and continue to bake for another 10-12 minutes, or until the crust is golden brown and the internal temperature reaches 165°F (74°C).
-
Serve: Remove from the oven and let the tenders rest for 2-3 minutes on the rack. This allows the crust to set. Serve immediately with your favorite dipping sauces.
Customize Your Crispy Baked Chicken Tenders
The beauty of this recipe is its adaptability. Don’t be afraid to get creative with the seasoning blend in the panko mixture!
-
Spicy Kick: Add ½ tsp of cayenne pepper, chili powder, or a dash of hot sauce to the egg wash.
-
Herbaceous Delight: Mix in 2 tablespoons of dried herbs like Italian seasoning, oregano, or thyme into the breadcrumb mix.
-
“Everything Bagel” Style: Replace the seasoning blend with 2 tablespoons of Everything Bagel Seasoning for a trendy, savory twist.
Serving Suggestions & Dipping Sauces
Your perfect Crispy Baked Chicken Tenders deserve the perfect accompaniments.
Classic Sides:
-
Creamy Mac and Cheese
-
Crispy Oven-Baked Fries or Sweet Potato Fries
-
A simple Green Salad with a tangy vinaigrette
-
Coleslaw
-
Buttery Corn on the Cob
Dipping Sauce Bar:
-
Honey Mustard: The classic pairing. Mix equal parts Dijon mustard and honey.
-
Ranch: A perennial favorite, homemade or store-bought.
-
BBQ Sauce: Sweet, smoky, and perfect.
-
Buffalo Sauce: Toss the hot tenders right in the sauce for Buffalo chicken tenders.
-
Sriracha Mayo: Mix sriracha with mayonnaise for a creamy, spicy kick.
Storage and Reheating Instructions
Storage: Allow leftover tenders to cool completely. Store them in an airtight container in the refrigerator for up to 3-4 days.
Reheating for Maximum Crispiness: To avoid a microwave-induced soggy disaster, reheat in a conventional oven or toaster oven. Place tenders on a wire rack set over a baking sheet and bake at 375°F (190°C) for 5-10 minutes, or until hot and crisp. An air fryer also works wonderfully for reheating, restoring the crunch in just a few minutes.
PrintThe Ultimate Guide to Irresistibly Crispy Baked Chicken Tenders

These homemade baked chicken tenders are a healthier alternative to deep-fried versions but just as crispy and flavorful. Tender, juicy chicken strips are coated in a golden breadcrumb mixture and baked to perfection. Perfect for weeknight dinners, meal prep, or a fun family meal, they pair wonderfully with your favorite dipping sauces.
Ingredients
-
1 lb chicken breasts or chicken tenders, cut into strips
-
2 large eggs, beaten
-
1 cup panko breadcrumbs (or regular breadcrumbs)
-
½ cup grated Parmesan cheese (optional for extra flavor)
-
1 tsp garlic powder
-
1 tsp paprika
-
½ tsp onion powder
-
½ tsp salt
-
¼ tsp black pepper
-
Olive oil spray
Instructions
1. Prep the Chicken
-
If using chicken breasts, cut them into 1-inch wide strips. If using tenders, skip this step.
2. Prepare the Breading Stations
-
In one bowl, beat the eggs until smooth.
-
In another bowl, combine the breadcrumbs, Parmesan (if using), garlic powder, paprika, onion powder, salt, and black pepper.
3. Season the Chicken
-
Lightly season the chicken strips with salt and pepper.
4. Bread the Chicken
-
Dip each strip in the beaten egg, letting excess drip off.
-
Coat the chicken in the breadcrumb mixture, pressing lightly to ensure crumbs stick.
-
For extra crunch, repeat the egg and breadcrumb process for a double coating.
5. Prepare the Baking Sheet
-
Line a baking sheet with parchment paper or a silicone mat.
-
Optional: Place a wire rack on the sheet to allow air circulation for crispier tenders.
6. Arrange and Bake
-
Place breaded chicken strips on the baking sheet or rack, leaving space between them.
-
Lightly spray with olive oil.
-
Bake in a preheated oven at 400°F (200°C) for 20–25 minutes, flipping halfway through, until golden brown and crisp.
-
Ensure internal temperature reaches 165°F (74°C).
7. Serve
-
Let the tenders rest a few minutes.
-
Serve with dipping sauces like honey mustard, BBQ, or ranch.
Notes
-
Extra crispy: Use panko breadcrumbs and a wire rack for better air circulation.
-
Flavor variations: Add smoked paprika, chili powder, or Italian seasoning to the breadcrumb mix.
-
Make-ahead: Bread the chicken and refrigerate for up to 1 day before baking.
-
Air fryer option: Bake in an air fryer at 400°F (200°C) for 12–15 minutes for faster cooking.
Nutrition
- Calories: 375 kcal per serving
- Fat: 12 g
- Carbohydrates: 20 g
- Protein: 38 g
Final Thoughts
The journey to creating the perfect Crispy Baked Chicken Tenders is one of simple, yet impactful, techniques. It demonstrates that with a little knowledge—the power of panko, the utility of a wire rack, the importance of a hot oven and a light spray of oil—you can create a healthier version of a comfort food classic that doesn’t sacrifice an ounce of flavor or texture. This recipe is more than just a set of instructions; it’s a reliable foundation. It’s a dish that will earn its place in your regular meal rotation, satisfying cravings, impressing guests, and bringing your family to the table with eager anticipation. So, preheat that oven, grab your panko, and get ready to experience a chicken tender that is truly, undeniably, and wonderfully perfect in its crispiness. Your new go-to dinner is waiting.