Japanese Katsu Bowls: A Delicious Guide to Making Authentic Katsu at Home
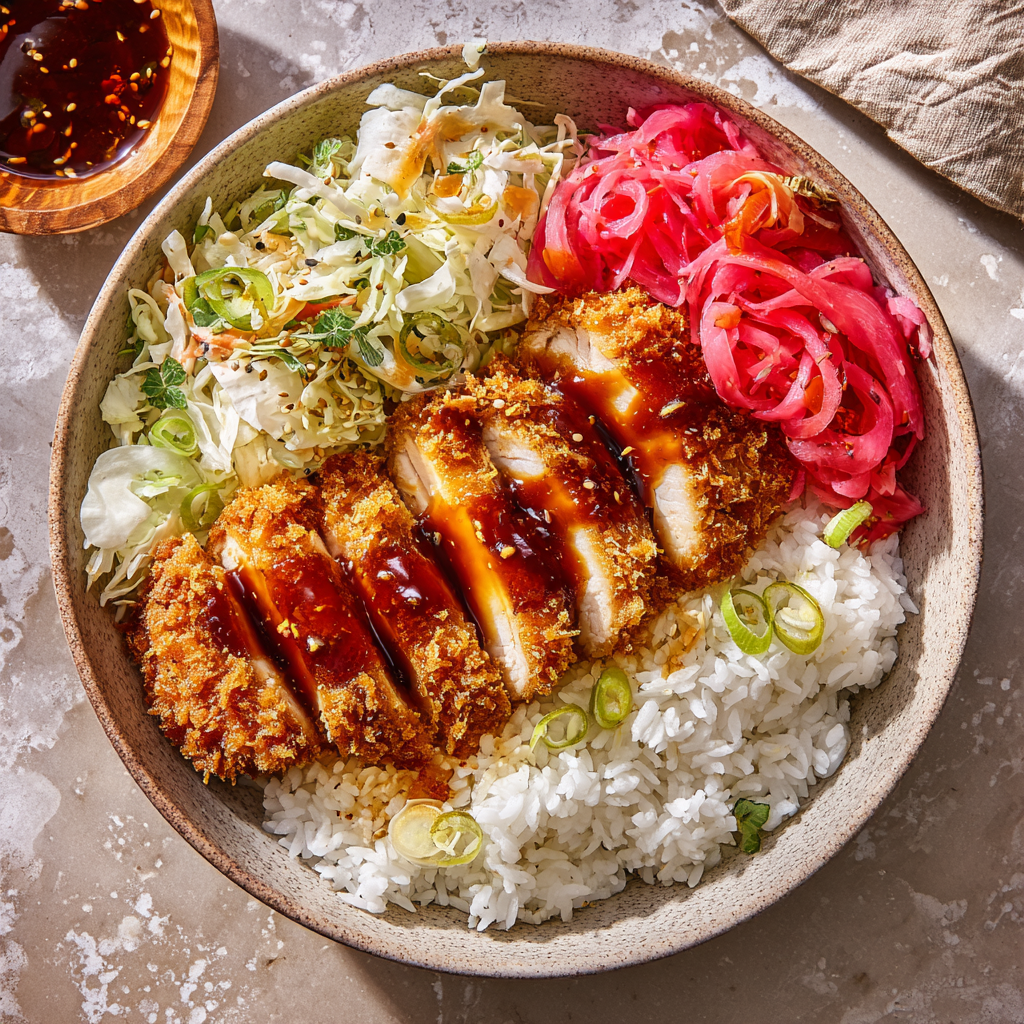
When it comes to comforting and satisfying meals, Japanese Katsu Bowls rank high on the list of favorite Japanese comfort foods. This iconic dish combines crunchy golden-fried katsu — usually made with chicken or pork — with fluffy steamed rice, crisp shredded cabbage, and a drizzle of rich, tangy tonkatsu-style sauce. Together, these ingredients create the perfect balance of crunch, tenderness, and bold flavor.
Japanese Katsu Bowls are the type of dish you crave at the end of a busy day — hearty, delicious, and surprisingly easy to make at home. Whether you want to recreate the experience of a casual Japanese restaurant or elevate a simple weeknight dinner, this recipe is the perfect guide to creating your own homemade katsu masterpiece.
More breakfast ideas you’ll love
This detailed post covers everything from the history of katsu, tips for achieving the perfect crunchy crust, ingredient variations, serving ideas, and a beginner-friendly, step-by-step recipe. By the end, you’ll feel confident enough to make Japanese Katsu Bowls part of your weekly dinner rotation!
What Are Japanese Katsu Bowls?
A Japanese Katsu Bowl, traditionally known as Katsudon when served with an egg sauce, refers to a prepared version of breaded and deep-fried katsu served over rice with flavorful toppings. The word:
-
Katsu = cutlet, derived from the English word cutlet
-
Don or Donburi = rice bowl dish
Unlike Katsudon, which includes an onion-egg broth poured over the katsu, Katsu Bowls focus more on clean presentation, usually featuring:
✔ Sauce-drizzled sliced fried katsu
✔ Warm Japanese short-grain rice
✔ Fresh shredded cabbage
✔ Garnishes like sesame seeds and scallions
This simplified style highlights the crispy texture and bold flavor of the fried cutlet — making it extremely popular worldwide.
A Quick Look at the Origins of Katsu
Katsu has a fascinating background tied to Western influences in Japan. The first version appeared in the late 1800s during the Meiji era, as Japan began integrating European foods into local cuisine. Inspired by tonkatsu — a breaded pork cutlet based on Austrian Wiener schnitzel — the Japanese refined the technique using panko breadcrumbs, resulting in the lighter, crispier coating we know today.
Over time, regional variations developed:
| Type of Katsu | Protein | Style |
|---|---|---|
| Chicken Katsu | Chicken breast/thigh | Light, lean, and popular universally |
| Tonkatsu | Pork loin or tenderloin | Traditional Japanese favorite |
| Gyukatsu | Beef cutlet | Often served medium-rare in Japan |
| Fish Katsu | White fish | Crisp and flaky alternative |
Chicken katsu has taken the spotlight globally, becoming the most popular version for Katsu Bowls.
Why You’ll Love Japanese Katsu Bowls
✔ Crispy outside, juicy inside → Perfect texture combo
✔ Customizable → Protein, sauces, and veggies can vary
✔ Balanced meal → Protein + carbs + fresh veg
✔ Restaurant-quality at home
✔ Family-approved comfort food
It’s both indulgent and wholesome — making it a perfect homemade meal for any night of the week.
Ingredients for Japanese Katsu Bowls
Below is the exact ingredient list used for this recipe — simple, accessible, and authentic.
Katsu
-
2 boneless chicken breasts (or pork loin if preferred)
-
Salt and pepper, to taste
-
1 cup all-purpose flour
-
2 large eggs
-
1 cup panko breadcrumbs
-
Vegetable oil, for frying
Rice Base
-
2 cups Japanese short-grain rice
-
2 ½ cups water
-
1 tablespoon rice vinegar
-
1 tablespoon sugar
-
½ teaspoon salt
Katsu Sauce
-
¼ cup tonkatsu sauce (store-bought or homemade)
-
1 tablespoon soy sauce
-
1 teaspoon Worcestershire sauce
-
1 teaspoon ketchup
Toppings and Garnishes
-
1 cup shredded cabbage
-
2 green onions, sliced
-
Sesame seeds
-
Pickled ginger (optional for extra flavor balance)
Step-by-Step Instructions: How to Make Japanese Katsu Bowls
1️⃣ Prepare the Rice
Japanese rice is a key part of the dish — chewy, sticky, and lightly seasoned.
-
Rinse rice under cold water until clear.
-
Add water and soak for 30 minutes in a saucepan.
-
Cover, bring to a boil, then reduce heat and simmer for 15 minutes without lifting the lid.
-
Turn off heat and rest for 10 more minutes.
-
Mix rice vinegar, sugar, and salt until dissolved and fold into cooked rice.
Tip: Use a rice paddle and fold gently to prevent mashing grains.
2️⃣ Prep and Breading the Katsu
-
Pound chicken breasts to ½-inch thickness for even cooking.
-
Season with salt & pepper.
-
Set up breading station: flour → beaten eggs → panko.
-
Dredge in flour first (shake off excess).
-
Dip in eggs.
-
Press firmly into panko for a full, crunchy coating.
Crunch secret: Allow breaded chicken to sit 5–10 minutes before frying.
3️⃣ Fry the Chicken Katsu
-
Heat oil in a skillet over medium-high heat.
-
Fry chicken 4–5 minutes per side until golden and internal temp reaches 165°F (74°C).
-
Drain on paper towels and rest 5 minutes before slicing.
Air Fryer Option: 400°F (205°C) for 10–15 minutes, flipping halfway.
4️⃣ Make the Katsu Sauce
Stir together:
-
Tonkatsu sauce
-
Soy sauce
-
Worcestershire
-
Ketchup
Adjust amounts to taste — sweeter, tangier, or spicier.
5️⃣ Assemble the Japanese Katsu Bowls
-
Scoop rice into bowls.
-
Add shredded cabbage for freshness.
-
Slice katsu and arrange on top.
-
Drizzle generously with katsu sauce.
-
Add sliced green onion, sesame seeds, and optional pickled ginger.
Serve immediately while crispy!
Expert Tips for the Perfect Japanese Katsu Bowls
✨ Use panko, not regular breadcrumbs — it fries lighter and crunchier
✨ Preheat oil properly → greasy katsu happens when oil is too cold
✨ Let fried chicken rest → keeps juices inside
✨ Shred cabbage super finely → authentic Japanese texture
✨ Use Japanese short-grain rice for the best donburi experience
Sauce Variations for Creativity
You can switch up your Katsu Bowls with new flavors:
| Sauce | Flavor Profile | Best With |
|---|---|---|
| Spicy Mayo | Creamy + Spicy | Chicken |
| Curry Sauce | Rich + Savory | Pork |
| Teriyaki | Sweet + Sticky | Chicken/Fish |
| Chili-Garlic | Bold + Fiery | Chicken |
Try drizzling multiple sauces for a fusion twist!
Protein Variations
Customize with what you already have:
-
Chicken thigh katsu (juicier)
-
Pork tenderloin tonkatsu (classic)
-
Shrimp katsu
-
Tofu katsu (vegetarian)
Tofu variant tip → freeze tofu first for meaty texture!
Side Dishes to Serve with Japanese Katsu Bowls
Upgrade your dinner into a restaurant-style meal:
-
Miso soup
-
Edamame
-
Tempura vegetables
-
Pickled cucumbers or daikon
-
Japanese potato salad
-
Gyoza dumplings
-
Nori sheets for extra crunch
How to Store and Reheat Leftovers
| Method | How To | Texture Result |
|---|---|---|
| Air Fryer | 375°F for 4–6 mins | Crispiest |
| Oven | 350°F for 10–12 mins | Good texture |
| Microwave | 60–90 sec | Soft, less crispy |
Store rice and katsu separately for best preservation.
Shelf Life:
-
Rice → 3–4 days refrigerated
-
Katsu → 2–3 days refrigerated, 1–2 months frozen
Freeze before saucing for best results!
PrintJapanese Katsu Bowls: A Delicious Guide to Making Authentic Katsu at Home

Japanese Katsu Bowls are a beloved comfort food featuring crispy breaded meat served over fluffy rice with a bold and tangy tonkatsu-style sauce. This version brings restaurant-quality Chicken Katsu straight to your home kitchen using simple ingredients. Perfect for a cozy dinner, a fun date night meal, or an impressive dish for guests — without complicated cooking steps!
Ingredients
For the Chicken Katsu
-
2 boneless, skinless chicken breasts (or pork loin)
-
Salt and pepper, to taste
-
1 cup all-purpose flour
-
2 large eggs (beaten)
-
1 cup panko breadcrumbs
-
Vegetable oil, for frying
For the Rice
-
2 cups Japanese short-grain rice
-
2 ½ cups water
-
1 tablespoon rice vinegar
-
1 tablespoon sugar
-
½ teaspoon salt
For the Sauce
-
¼ cup tonkatsu sauce (or homemade mixture below)
-
1 tablespoon soy sauce
-
1 teaspoon Worcestershire sauce
-
1 teaspoon ketchup
For Serving
-
1 cup shredded cabbage
-
2 green onions, thinly sliced
-
Sesame seeds, for garnish
-
Pickled ginger (optional)
Instructions
1️⃣ Make the Rice
-
Rinse rice under cold water until the water runs clear.
-
Add rice and 2 ½ cups water to a saucepan, soak for 30 minutes.
-
Cover and bring to a boil, then reduce to low simmer for 15 minutes.
-
Turn off heat and rest for 10 minutes — do not remove the lid.
-
Mix vinegar, sugar, and salt until dissolved, then gently fold into rice.
2️⃣ Prepare the Katsu
-
Pound chicken to ½-inch thickness for even cooking; season with salt and pepper.
-
Set up a breading station: flour → beaten eggs → panko.
-
Coat each piece in flour first, then egg, then panko — press firmly so crumbs stick well.
-
Heat oil in a skillet over medium heat (350°F / 175°C).
-
Fry chicken 4–5 minutes per side until golden and cooked through.
-
Transfer to paper towels and rest 2–3 minutes before slicing.
3️⃣ Mix the Sauce
-
Stir together tonkatsu sauce, soy sauce, Worcestershire, and ketchup.
4️⃣ Assemble
-
Scoop rice into bowls.
-
Lay sliced katsu on top.
-
Add shredded cabbage and sprinkle green onions & sesame seeds.
-
Drizzle with tonkatsu sauce and add pickled ginger if desired.
Notes
-
Extra Crispy Tip: Double-dip — egg ➜ panko ➜ egg ➜ panko for ultra crunch.
-
Don’t overcrowd the pan: Fry chicken in batches for even crispiness.
-
Healthier option: Air fry chicken at 375°F (190°C) for 12–15 minutes, flipping halfway.
-
Sauce substitute: BBQ sauce + soy sauce works great in a pinch.
-
Rice shortcut: Use a rice cooker for easy, consistent results.
Nutrition Information (Approx. per serving)
-
Calories: ~780
-
Protein: 38g
-
Fat: 28g
-
Carbohydrates: 88g
-
Fiber: 3g
Values vary by ingredients and cooking method.
Final Thoughts
Japanese Katsu Bowls are one of the best ways to bring the flavors of Japan into your home kitchen. With crispy chicken or pork cutlets, fluffy seasoned rice, and a bold, tangy sauce — this dish delivers a satisfying and delightfully memorable meal every single time.
Whether you’re cooking for family, friends, or just yourself, this recipe is guaranteed to impress. Once you master the basics, you’ll find endless ways to personalize your Katsu Bowls — different sauces, sides, and proteins to match your cravings.
Give this delicious Japanese comfort food a try tonight — and enjoy the satisfying crunch and flavors of a restaurant-worthy dish made right at home!