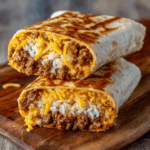
The Ultimate Homemade Grilled Cheese Burrito: A Crispy, Cheesy Masterpiece
If you’ve ever found yourself scrolling through foodie social media or gazing at a fast-food menu, chances are you’ve encountered the behemoth of indulgence known as the Grilled Cheese Burrito. It’s a name that promises the impossible: the gooey, comforting perfection of a grilled cheese sandwich fused with the hearty, flavor-packed satisfaction of a fully-loaded burrito. And let me tell you, it delivers on that promise in a way that is nothing short of glorious.
This isn’t just another burrito. This is a culinary event. The concept is ingeniously simple yet revolutionary: take a burrito already stuffed with delicious fillings, then griddle it not in butter or oil, but directly onto a layer of shredded cheese that melts and fuses to the tortilla, creating a spectacularly crispy, cheesy, lacquered crust. The result is a textural and flavorful dream—a soft, warm, saucy interior encased in a savory, crunchy cheese shell.
More breakfast ideas you’ll love
Today, we’re not just talking about this marvel; we’re creating the ultimate homemade version. This recipe for a Grilled Cheese Burrito gives you complete control over the quality of ingredients, allowing you to elevate it from a fast-food fix to a gourmet-level comfort food experience right in your own kitchen. We’ll walk through every step, explore the science behind the perfect crust, and delve into endless customizations. So, tie on your apron, and let’s embark on a journey to create the most unforgettable Grilled Cheese Burrito you’ve ever tasted.
Deconstructing the Genius: Why the Grilled Cheese Burrito Works
Before we dive into the recipe, it’s worth understanding why this particular food item has captured so many hearts and stomachs. The magic of the Grilled Cheese Burrito lies in its masterful manipulation of texture and its unabashed celebration of umami.
-
The Maillard Reaction Meets Cheese: When you cook a burrito on a hot surface, you’re encouraging the Maillard reaction—the chemical process that creates browning and complex, savory flavors. By using cheese as the primary cooking medium, you’re introducing milk proteins and fats to this high heat. The cheese doesn’t just brown; it fuses. It creates a brittle, flavor-concentrated layer that is entirely different from a simply melted interior cheese. It’s the difference between adding cheese to a dish and making the cheese part of the dish’s structure.
-
The Textural Symphony: A great eating experience is all about texture. A standard burrito can sometimes be homogeneously soft. The Grilled Cheese Burrito shatters that monotony (literally). Your teeth first break through the crispy, savory cheese crust into the soft, pliable tortilla, before reaching the warm, fluffy rice, the savory beef, and the creamy, cool sauces. This contrast is what makes every single bite dynamic and exciting.
-
Flavor Layering: The ingredients in a Grilled Cheese Burrito are carefully chosen to create a harmonious flavor profile. The seasoned beef provides a savory, spiced base. The rice is a neutral canvas that soaks up all the other flavors. The nacho cheese sauce adds a creamy, tangy sharpness, while the chipotle sauce introduces a smoky, subtle heat. The sour cream offers a cool, creamy contrast that cuts through the richness. And finally, the external cheese crust adds a deep, toasty, nutty flavor that wraps the entire package in a savory blanket.
Crafting Your Homemade Grilled Cheese Burrito: A Step-by-Step Deep Dive
This recipe is designed to be quick and efficient, but great cooking is in the details. Let’s break down each component to ensure your homemade Grilled Cheese Burrito is a resounding success.
Yield: 4 burritos
Total Time: 25 minutes
Ingredients: The Building Blocks of Flavor
The beauty of making a Grilled Cheese Burrito at home is the ability to customize, but let’s start with the classic, perfect foundation.
-
1 lb ground beef (80/20 blend): The fat content is crucial for flavor and moisture. You can use leaner beef, but you may need a touch of oil for cooking.
-
1 packet taco seasoning (or homemade blend): A homemade blend (chili powder, cumin, paprika, garlic powder, onion powder, oregano, salt, and pepper) gives you control over sodium and spice.
-
1 cup cooked white rice: Long-grain or medium-grain rice works best. It’s important it’s cooled slightly so it doesn’t make the tortilla soggy. For an authentic touch, consider seasoning your rice with a squeeze of lime juice and a sprinkle of cilantro.
-
½ cup sour cream: Full-fat will provide the best creaminess and tang.
-
½ cup nacho cheese sauce: You can use a store-bought jar for convenience, or make a simple homemade version with a roux, milk, and shredded sharp cheddar or pepper jack.
-
¼ cup chipotle sauce: This is the secret weapon for smoky heat. You can mix chipotle peppers in adobo sauce with a little mayo or sour cream to create a quick, flavorful sauce.
-
1 cup shredded cheddar cheese: For that classic, sharp flavor.
-
1 cup shredded mozzarella cheese: Chosen for its superb meltability and stretch.
-
4 large (10-inch) flour tortillas: The size is non-negotiable. You need the real estate to hold all the fillings and fold it properly. Look for “burrito-size” tortillas.
-
Butter or oil for grilling: While we use cheese as the primary cooking surface, a very light brush of butter or oil on the other side can add extra golden color and flavor.
Instructions: The Art of Assembly and the Science of the Grill
Step 1: Cook the Beef (8-10 minutes)
This is more than just browning meat. Place your ground beef in a skillet over medium heat. Use a wooden spoon to break it up into small, crumbly pieces. This ensures even cooking and perfect distribution in the burrito. Once it’s fully browned and no pink remains, drain the excess grease. This step is vital; too much grease will make your burrito soggy and cause it to leak.
Now, add the taco seasoning and ¼ cup of water. The water might seem counterintuitive, but it’s essential. It allows the spices to hydrate and bloom, creating a saucy coating that clings to the meat rather than a dry, dusty coating. Let it simmer for 4-5 minutes until the water has mostly evaporated, leaving you with perfectly seasoned, moist beef.
Step 2: Warm the Tortillas (2 minutes)
This is the most commonly skipped step, and it’s a critical error. A cold tortilla is brittle and will crack when you try to fold it. Gently warming your tortillas makes the gluten and starches pliable.
-
Skillet Method: Heat a dry skillet over medium heat and warm each tortilla for 15-20 seconds per side until soft and puffy in spots.
-
Microwave Method: Stack the tortillas on a plate, cover them with a damp paper towel, and microwave for 30-45 seconds.
Your tortillas are now ready to be transformed.
Step 3: Assemble the Burrito (The 5-Minute Masterclass)
Lay a warm tortilla flat on a clean surface. The order and placement of ingredients are strategic.
-
The Rice Base: Start with a layer of rice, spread horizontally across the center, but leave a 2-inch border at the top and bottom. The rice acts as a bed and helps absorb excess moisture from other ingredients.
-
The Protein Layer: Spoon a generous portion of the seasoned beef directly on top of the rice.
-
The Sauces: Drizzle the nacho cheese sauce and chipotle sauce over the beef. Be bold but avoid the very edges to prevent seepage.
-
The Cool Creaminess: Add dollops of sour cream.
-
The Internal Cheese: Sprinkle a handful of the mixed cheddar and mozzarella cheeses over everything. This is your internal cheese layer, which will melt and bind the fillings together.
The Fold: This is where the burrito is born. Fold the left and right sides of the tortilla inward over the fillings. Then, starting from the bottom, tightly roll the burrito upwards, tucking the fillings in as you go, until you have a sealed, cylindrical package. The tightness is key—a loose burrito will fall apart during grilling.
Step 4: Grill the Burrito – The Grand Finale (3-4 minutes per side)
This is the moment of truth, the step that creates the legendary Grilled Cheese Burrito.
-
Heat a non-stick or cast-iron skillet over medium heat. Do not add butter or oil yet.
-
Take 2 tablespoons of your shredded cheese blend and sprinkle it in a line on the hot skillet, roughly the length and width of your burrito.
-
Immediately, place the burrito, seam-side down, directly onto the bed of melting cheese. Press down gently. The cheese will act as a glue, sealing the seam shut while simultaneously creating the crust.
-
Let it cook for 3-4 minutes. Don’t touch it! You’ll know it’s ready when you can see the cheese underneath has turned a deep, golden brown and has formed a solid crust.
-
Carefully flip the burrito. At this point, you can sprinkle another tablespoon or two of cheese on the hot skillet and place the burrito on top of it again, or simply grill the other side until it’s lightly toasted. For the full experience, I highly recommend the double-cheese method.
-
Remove from the skillet and let it rest for a minute or two before cutting. This allows the molten interior to settle, preventing a volcanic eruption of filling on your first bite.
Notes, Customizations, and Pro-Tips
-
Storage Tips: Store any leftover Grilled Cheese Burrito in an airtight container in the refrigerator for up to 3 days. The crust will soften, but the flavor will still be fantastic.
-
Reheating Tips: To resurrect the crispy crust, reheat in a dry skillet over medium-low heat for 5-7 minutes, turning occasionally. The microwave (60-90 seconds) will work for speed but will result in a soft tortilla.
-
Customizations: The Sky’s the Limit
-
Protein Swap: Use ground chicken, turkey, shredded chicken, or carnitas. For a vegetarian Grilled Cheese Burrito, seasoned black beans or lentils are phenomenal.
-
Rice Upgrade: Use cilantro-lime rice or Mexican red rice for an extra flavor boost.
-
Spice It Up: Add fresh or pickled jalapeños, a dash of hot sauce, or use pepper jack cheese.
-
Add Veggies: Sautéed bell peppers and onions or fresh corn would be wonderful additions.
-
Vegan Version: Use a plant-based ground “beef,” vegan cheeses, and vegan sour cream. The grilling technique works exactly the same!
-
Nutritional Information: A Conscious Indulgence
Let’s be real: the Grilled Cheese Burrito is not a diet food. It’s a treat, a celebration, a comfort meal. Our homemade version allows you to make smarter choices, like using leaner beef, low-fat cheese, or loading up on veggies. As crafted, one burrito is a satisfying, balanced meal that provides a good mix of protein, carbs, and fats to keep you full and happy.
PrintThe Ultimate Homemade Grilled Cheese Burrito: A Crispy, Cheesy Masterpiece
Satisfy your cravings with this Grilled Cheese Burrito, inspired by Taco Bell! Packed with seasoned beef, fluffy rice, creamy nacho cheese, and a touch of chipotle sauce, all wrapped in a tortilla and grilled with extra cheese for a crispy, golden crust. Quick, easy, and utterly irresistible—perfect for a weeknight meal or a fun comfort food treat.
- Author: alae
Ingredients
-
1 lb ground beef
-
1 packet taco seasoning (or homemade blend)
-
1 cup cooked white rice
-
½ cup sour cream
-
½ cup nacho cheese sauce
-
¼ cup chipotle sauce
-
1 cup shredded cheddar cheese
-
1 cup shredded mozzarella cheese
-
4 large flour tortillas
-
Butter or oil for grilling
Instructions
-
Cook the Beef (8–10 mins)
-
Brown the ground beef in a skillet over medium heat. Drain excess grease.
-
Add taco seasoning and ¼ cup water; simmer for 5 minutes.
-
-
Warm the Tortillas
-
Heat tortillas on a dry skillet or in the microwave until pliable.
-
-
Assemble the Burrito (5 mins)
-
Lay a tortilla flat and layer with rice, seasoned beef, nacho cheese, chipotle sauce, and sour cream.
-
Top with shredded cheddar and mozzarella.
-
-
Grill the Burrito (3–4 mins per side)
-
Heat a clean skillet and sprinkle 2 tbsp shredded cheese.
-
Place the burrito seam-side down and cook until the cheese melts and forms a crispy crust.
-
Flip and repeat on the other side.
-
Notes
-
Storage: Store leftovers in an airtight container for up to 3 days.
-
Reheating: Reheat on the stovetop for crispy cheese or in the microwave for 60–90 seconds for convenience.
-
Add-Ins: Try black beans, jalapeños, or shredded chicken for extra flavor.
-
Vegan Option: Use dairy-free cheese and sour cream.
Nutrition
- Calories: 450 kcal per serving
- Carbohydrates: 50g
- Fiber: 3g
- Protein: 15g
Final Thoughts on the Grilled Cheese Burrito
The Grilled Cheese Burrito is more than just a trendy food item; it’s a testament to culinary creativity and our endless pursuit of the ultimate comfort food. It takes two beloved classics and merges them into something greater than the sum of its parts. By making it at home, you reclaim the process, transforming it from a drive-thru secret into a customizable, shareable, and deeply satisfying kitchen achievement.
It’s a dish that promises joy in every crispy, cheesy, messy bite. It’s the perfect meal for a cozy night in, a surefire hit for a game-day spread, and a guaranteed way to impress family and friends. So, the next time that craving hits for something decadent, savory, and texturally perfect, don’t just dream about a Grilled Cheese Burrito. Head to your kitchen, gather your ingredients, and create this masterpiece for yourself. You’ll discover that the best Grilled Cheese Burrito isn’t the one you buy—it’s the one you make with your own hands, tailored perfectly to your taste, and shared with those you love. Happy cooking