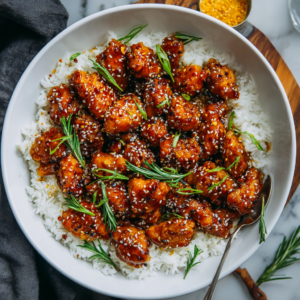
The Ultimate Baked Crunchy Hot Honey Chicken Recipe: A Healthier Take on a Flavor Sensation
If you’re on a quest for that perfect weeknight dinner that feels indulgent yet is secretly wholesome, a dish that delivers a symphony of textures and a fireworks display of flavors, then you have landed in the right place. This isn’t just another chicken recipe; this is The Ultimate Baked Crunchy Hot Honey Chicken Recipe. We’re talking about succulent, juicy chicken encased in a shatteringly crisp, golden-brown crust, all glazed with a sticky, sweet, and spicy hot honey sauce that will have you licking your fingers clean.
The beauty of this particular Baked Crunchy Hot Honey Chicken Recipe lies in its brilliant simplicity and its clever cooking method. By opting for the oven instead of a vat of bubbling oil, we achieve an incredible crunch without the guilt. This method is more forgiving, cleaner, and results in a consistently perfect chicken that’s cooked through without a greasy aftermath. The “hot honey” trend has taken the culinary world by storm for a reason—it’s a flawless pairing. The sweetness of the honey caramelizes on the hot, crunchy crust, while the heat from the sauce provides a lingering, warm kick that builds with every blissful bite.
More breakfast ideas you’ll love
This guide is more than just a list of ingredients and steps. We will delve deep into the why behind every technique, explore customizations to make this dish uniquely yours, and provide expert tips to ensure your Baked Crunchy Hot Honey Chicken is nothing short of spectacular every single time. So, preheat your oven, grab your apron, and let’s create some magic.
Yield: 4 servings
Prep Time: 20 minutes
Cook Time: 30 minutes
Total Time: 50 minutes
Ingredients for the Perfect Baked Crunchy Hot Honey Chicken
The foundation of any great recipe is quality ingredients. For this Baked Crunchy Hot Honey Chicken Recipe, each component plays a critical role in building layers of flavor and texture. Let’s break down the ingredients list and explore why each one is essential.
For the Chicken & Breading Station:
-
4 boneless, skinless chicken breasts or thighs (about 1.5 lbs): This is your canvas.
-
Breasts vs. Thighs: Chicken breasts are lean and yield larger, uniform pieces. They are a fantastic choice if you’re aiming for a classic presentation. However, chicken thighs are inherently more flavorful and juicy due to their higher fat content. They are less likely to dry out, making them a foolproof option, especially for those new to baking chicken. For the best of both worlds, you can use a mix!
-
Pro-Tip: Even Thickness. Whatever cut you choose, ensure they are of even thickness. If your chicken breasts are particularly plump, place them between two pieces of plastic wrap and gently pound them to a ¾-inch uniform thickness. This guarantees even cooking—no more dried-out edges with a raw center.
-
-
1 cup all-purpose flour: The first layer of the breading trifecta.
-
Purpose: The flour creates a dry base layer that the egg wash can adhere to. It also helps to soak up any residual moisture on the chicken’s surface, which is the enemy of crispiness.
-
-
1 teaspoon salt: The most important flavor enhancer.
-
Timing: Salting the flour mixture, rather than just the chicken itself, ensures that every bite of the crust is perfectly seasoned.
-
-
1 teaspoon black pepper: Provides a gentle, aromatic heat that complements the spicy sauce later on.
-
1 teaspoon garlic powder: Delivers a sweet, savory, and quintessentially “savory” flavor that permeates the crust without burning.
-
1 teaspoon onion powder: Adds a subtle sweetness and depth, rounding out the savory profile of the breading.
-
1/2 teaspoon smoked paprika (optional, but highly recommended): This is the secret weapon. Smoked paprika contributes a mild heat and a deep, smoky aroma that elevates the entire dish, adding a complexity that makes it taste like it came from a professional kitchen.
-
2 large eggs, beaten: The “glue” that binds the flour to the crunchy outer layer.
-
Technique: Beating the eggs thoroughly until they are homogenous is key for an even, non-patchy coating.
-
-
1 ½ cups panko breadcrumbs: The star of the “crunchy” show.
-
Why Panko? Panko is a Japanese-style breadcrumb made from crustless bread. The flakes are larger, airier, and coarser than traditional fine breadcrumbs. When baked, they create a lighter, flakier, and significantly crispier texture that doesn’t get soggy as easily. Do not substitute with regular breadcrumbs if you want that ultimate crunch.
-
For the Legendary Hot Honey Sauce:
-
1/4 cup honey: The sweet, sticky, caramelizing base of the sauce.
-
Quality Matters: Using a good-quality, flavorful honey (like wildflower or orange blossom) can add another subtle layer of flavor. However, standard clover honey works perfectly.
-
-
2 tablespoons hot sauce (adjust to your preferred heat level): The “hot” in hot honey.
-
Choosing Your Sauce: This is where you can customize the flavor profile. A classic vinegar-based sauce like Frank’s RedHot or Crystal provides a tangy heat that is iconic. If you prefer a smokier heat, Cholula or Tapatío are excellent choices. For a truly fiery experience, a dash of Sriracha or even a habanero-based sauce will do the trick. Start with 2 tablespoons and add more after tasting.
-
-
1 tablespoon unsalted butter: Butter is non-negotiable. It adds richness, gloss, and helps the sauce cling beautifully to the chicken’s crunchy surface.
-
1/2 teaspoon red pepper flakes (optional, for extra heat): These infuse the sauce with an additional layer of slow-building, earthy heat. Letting them simmer in the warm sauce allows their oils to release.
-
1 teaspoon apple cider vinegar or lemon juice (optional, for tang): A small but mighty addition. The acidity cuts through the sweetness and richness, balancing the sauce and making the flavors pop. I highly recommend not skipping this.
For Garnish (optional but recommended for presentation):
-
Fresh chopped parsley: Adds a fresh, green note and a pop of color.
-
Sesame seeds or crushed peanuts: Provides a visual appeal and an additional layer of nutty crunch.
Step-by-Step Instructions for Flawless Baked Crunchy Hot Honey Chicken
Follow these steps carefully, and you will be rewarded with a dish that is sure to become a regular in your dinner rotation.
Step 1: Preheat and Prepare the Oven
Action: Preheat your oven to 400°F (200°C). Line a baking sheet with parchment paper or a silicone baking mat.
The Science Behind It: A properly preheated oven is crucial. Putting the chicken into a cold oven will cause the coating to become greasy and soggy as it slowly heats up. The high temperature of 400°F is ideal for mimicking the effects of frying—it quickly cooks the exterior to a crisp while sealing in the chicken’s juices. The parchment paper or silicone mat prevents sticking and makes cleanup an absolute breeze.
Step 2: The Breading Station Assembly Line
Action: Set up three shallow dishes (pie plates or wide bowls work perfectly).
-
Dish 1: Combine the all-purpose flour, salt, black pepper, garlic powder, onion powder, and smoked paprika. Whisk them together until fully incorporated.
-
Dish 2: Beat the two large eggs until uniform.
-
Dish 3: Pour in the panko breadcrumbs.
Pro-Tip: The “Dry Hand, Wet Hand” Method. To avoid ending up with clumpy, breadcrumb-covered fingers, use one hand for the dry ingredients (flour and panko) and the other hand for the wet ingredient (egg). Your dominant hand is usually best for the egg. So, left hand dips in flour, then places chicken in egg (right hand coats it), then left hand places it in panko and coats. It’s a game-changer for cleanliness!
Step 3: Breading the Chicken Like a Pro
Action: Pat the chicken pieces completely dry with paper towels. This is the single most important step for achieving a crunchy crust. Moisture creates steam, which is the enemy of crispiness.
-
Dredge in Flour: Take a chicken piece and coat it thoroughly in the seasoned flour mixture. Shake off any excess.
-
Dip in Egg: Next, dip the floured chicken into the beaten egg, ensuring it’s fully coated and allowing any excess to drip off.
-
Press into Panko: Finally, place the chicken into the dish with the panko breadcrumbs. Sprinkle panko over the top and press down firmly. This pressing action is what ensures the breadcrumbs adhere properly and create a solid, crunchy shell that won’t fall off after baking. Don’t be gentle!
Place the perfectly breaded chicken pieces on the prepared baking sheet, ensuring they are not touching. This allows the hot air to circulate around each piece, promoting even browning and crisping.
Step 4: Baking to Golden-Brown Perfection
Action: Just before placing the chicken in the oven, lightly spray the tops of the breaded chicken with cooking spray (avocado or olive oil spray are great) or drizzle lightly with olive oil. This step is essential! The oil helps the panko brown and crisp up, giving it that “fried” appearance and texture.
Bake for 25-30 minutes. The cooking time will depend on the thickness of your chicken. The only way to know for sure if it’s done is by using a meat thermometer. The internal temperature should read 165°F (74°C) when inserted into the thickest part of the chicken.
Do not flip the chicken halfway through. Unlike traditional frying, flipping can disrupt the delicate crust we’ve worked so hard to create. The direct heat from the bottom of the oven and the circulated hot air will cook it perfectly.
Step 5: Crafting the Signature Hot Honey Sauce
Action: While the chicken is baking, prepare the sauce. In a small saucepan, combine the honey, hot sauce, butter, and red pepper flakes (if using). Heat over medium heat, stirring occasionally, until the butter is melted and the ingredients are smoothly combined and slightly simmering. Let it simmer for about 1 minute to allow the flavors to meld.
Remove from heat and stir in the apple cider vinegar or lemon juice. Taste and adjust! Want it spicier? Add more hot sauce or a pinch of cayenne. Want it tangier? A bit more vinegar. This is your sauce—make it perfect for your palate.
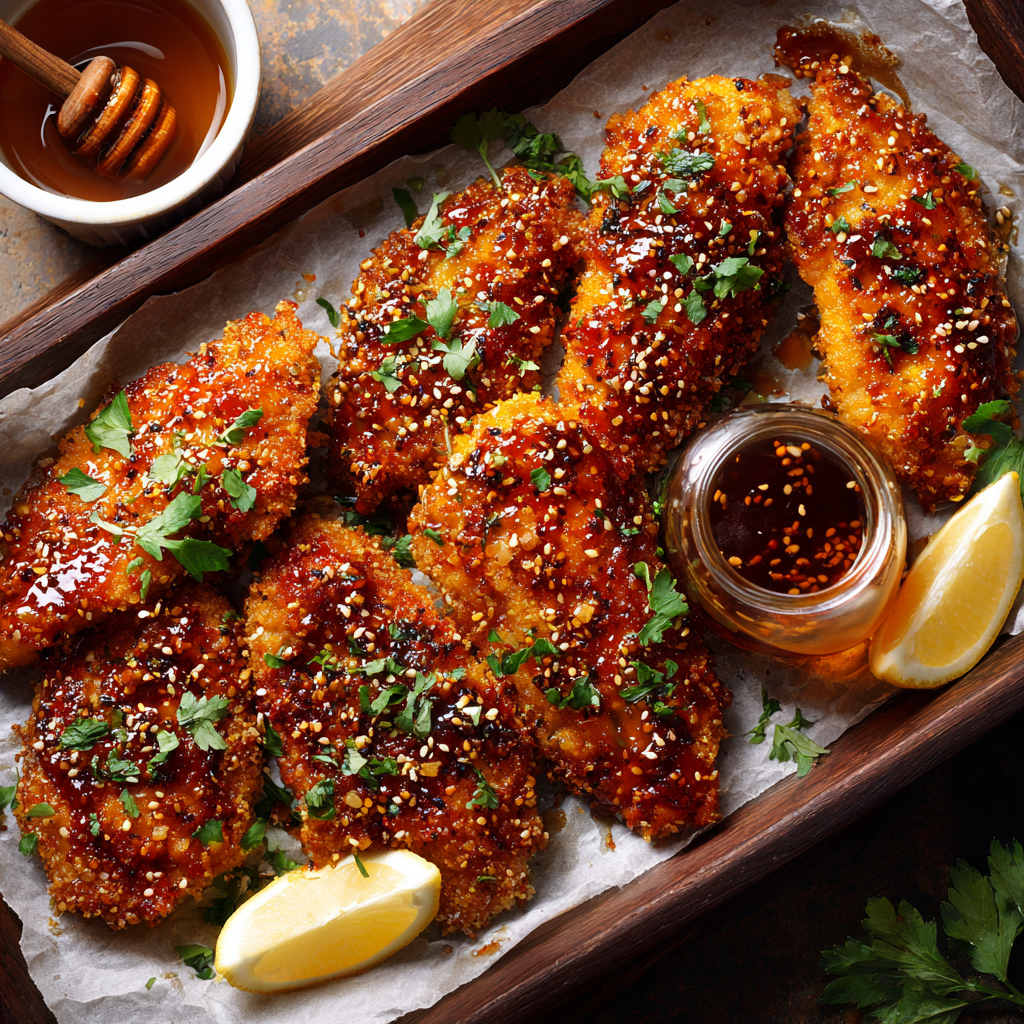
Step 6: The Grand Finale – Glazing and Serving
Action: Once the chicken is fully cooked and gloriously crispy, remove it from the oven. For the best texture, I recommend a two-step glazing process:
-
Light Glaze: Drizzle about half of the hot honey sauce over the chicken pieces directly on the baking sheet. This creates a beautiful glaze.
-
Serve with Extra Sauce: Serve the chicken immediately, with the remaining sauce on the side for dipping. This ensures that everyone gets the perfect sauce-to-chicken ratio and that the crust stays as crunchy as possible for as long as possible.
If you prefer a more heavily coated chicken (and don’t mind a slightly softer crust), you can carefully toss the baked chicken pieces in a large bowl with all of the sauce until fully coated.
Garnish with chopped parsley and a sprinkle of sesame seeds or crushed peanuts for that final touch of elegance and crunch.
Serving Suggestions: What to Serve with Your Baked Crunchy Hot Honey Chicken
This versatile dish pairs wonderfully with a variety of sides. Here are some ideas to create a complete, balanced meal:
-
For Comfort Food Heaven: Creamy mashed potatoes, garlic mashed cauliflower, or soft, buttery biscuits are ideal for soaking up the extra hot honey sauce.
-
For a Lighter Meal: A simple side salad with a sharp vinaigrette (to contrast the sweetness), steamed green beans, roasted broccoli, or a crisp coleslaw.
-
For a Southern Twist: Creamy coleslaw, cornbread, or classic mac and cheese.
-
For a Low-Carb Option: Serve over a bed of cauliflower rice or with a side of sautéed zucchini and mushrooms.
Expert Tips, Tricks, and FAQs for the Best Baked Crunchy Hot Honey Chicken
How to Ensure Maximum Crispiness
-
The Parchment Paper Trick: For an even crispier bottom, place a wire rack on top of your baking sheet and spray it with cooking spray. Place the breaded chicken on the rack. This elevates the chicken, allowing hot air to circulate underneath, preventing any sogginess.
-
The Power of Patting Dry: I cannot stress this enough. Dry chicken is crispy chicken.
-
Don’t Crowd the Pan: Giving each piece of chicken its personal space on the baking sheet is non-negotiable for even air flow and browning.
Can I Make This Baked Crunchy Hot Honey Chicken Recipe Ahead of Time?
-
Meal Prep Friendly: You can bread the chicken pieces up to a day in advance. Place them on the baking sheet, cover tightly with plastic wrap, and store in the refrigerator. The cold air can actually help the breading set. You may need to add 1-2 minutes to the baking time since the chicken will be starting from a colder temperature.
-
Reheating Leftovers: To recrisp leftover chicken, avoid the microwave. Reheat it in a 375°F oven or a toaster oven for 10-15 minutes, or until hot and crispy again. The air fryer is also fantastic for this, reheating in about 5-7 minutes at 370°F.
Customization and Variations
The beauty of this Baked Crunchy Hot Honey Chicken Recipe is its adaptability.
-
Spice Level: Control the heat easily. For a mild version, use a milder hot sauce and omit the red pepper flakes. For “fire-breathing dragon” level, add a teaspoon of cayenne pepper to the flour mixture and use a ghost pepper hot sauce.
-
Gluten-Free Option: This recipe can easily be made gluten-free. Substitute the all-purpose flour with your favorite GF flour blend (one that contains a binder like xanthan gum works best). Use certified gluten-free panko breadcrumbs.
-
Different Proteins: This method works wonderfully with pork chops (cook to 145°F internally) or even with large, peeled shrimp (reduce baking time to 10-15 minutes). You can also make incredible Baked Crunchy Hot Honey Chicken Tenders by cutting chicken breasts into strips and reducing the baking time to 15-20 minutes.
Frequently Asked Questions (FAQ)
Q: My breading always falls off. What am I doing wrong?
A: The most common reasons are not patting the chicken dry, not shaking off excess flour or egg, and not pressing the panko on firmly enough. Follow the “dry, dredge, dip, press” method precisely.
Q: Can I use an air fryer instead of an oven?
A: Absolutely! This translates beautifully to an air fryer. Preheat your air fryer to 380°F. Arrange the breaded chicken in a single layer (you may need to cook in batches), spray with oil, and air fry for 12-16 minutes, flipping halfway through, until golden and cooked to 165°F.
Q: Is there a substitute for panko breadcrumbs?
A: While panko is best for crunch, you can use regular breadcrumbs in a pinch. The texture will be denser and more like a traditional breading. Crushed cornflakes or crushed pork rinds (for a low-carb option) are also excellent, crunchy alternatives.
Q: How can I make the sauce thicker?
A: If you prefer a thicker, glaze-like sauce, let it simmer for a few extra minutes until it reduces slightly. You can also create a slurry by mixing ½ teaspoon of cornstarch with a tablespoon of cold water and whisking it into the simmering sauce. Cook for another minute until thickened.
The Science of Sweet and Spicy: Why We Love This Flavor Combo
The irresistible allure of this Baked Crunchy Hot Honey Chicken Recipe isn’t an accident; it’s rooted in sensory science. The combination of sweet and spicy is a culinary powerhouse because it engages multiple pleasure centers in the brain. The initial sweetness from the honey provides an immediate hit of enjoyment. This is quickly followed by the capsaicin from the hot sauce, which triggers a mild, pleasurable stress response, releasing endorphins. The result? A complex, exciting, and deeply satisfying eating experience that keeps you coming back for more. The contrasting textures—the audibly crunchy crust against the tender chicken—add another layer of sensory delight, making each bite a mini-adventure.
PrintThe Ultimate Baked Crunchy Hot Honey Chicken Recipe: A Healthier Take on a Flavor Sensation

If you love the irresistible combo of crispy, crunchy chicken with a sweet and spicy kick, this Baked Crunchy Hot Honey Chicken is your new go-to. It’s healthier than deep-fried versions but just as satisfying, with a golden, crunchy crust and a sticky, flavorful honey glaze.
Ingredients
For the Chicken:
-
4 boneless, skinless chicken breasts or thighs (about 1.5 lbs)
-
1 cup all-purpose flour
-
1 teaspoon salt
-
1 teaspoon black pepper
-
1 teaspoon garlic powder
-
1 teaspoon onion powder
-
½ teaspoon smoked paprika (optional)
-
2 large eggs, beaten
-
1 ½ cups panko breadcrumbs
For the Hot Honey Sauce:
-
¼ cup honey
-
2 tablespoons hot sauce (adjust to taste)
-
1 tablespoon unsalted butter
-
½ teaspoon red pepper flakes (optional)
-
1 teaspoon apple cider vinegar or lemon juice (optional)
For Garnish (optional):
-
Fresh chopped parsley
-
Sesame seeds or crushed peanuts
Instructions
-
Preheat the Oven
Preheat oven to 400°F (200°C). Line a baking sheet with parchment paper or a silicone mat. -
Prepare the Chicken
Pat chicken dry.-
In a shallow dish, mix flour, salt, pepper, garlic powder, onion powder, and smoked paprika.
-
In another shallow dish, beat the eggs.
-
In a third shallow dish, place the panko breadcrumbs.
Coat each chicken piece: flour → egg → breadcrumbs, pressing gently to ensure the crumbs stick.
-
-
Bake the Chicken
Place coated chicken on the prepared baking sheet. Lightly spray with cooking spray or drizzle with olive oil.
Bake 25–30 minutes until golden brown and fully cooked (internal temperature 165°F/74°C). -
Make the Hot Honey Sauce
In a small saucepan, combine honey, hot sauce, butter, and red pepper flakes. Heat over medium, stirring until smooth and butter is melted.
Add apple cider vinegar or lemon juice for a tangy twist, if desired. -
Glaze the Chicken
Drizzle the hot honey sauce over baked chicken, or toss the chicken in the sauce for more coverage. -
Garnish and Serve
Sprinkle with chopped parsley and sesame seeds or crushed peanuts. Serve with roasted vegetables, mashed potatoes, or a fresh salad.
Notes
-
Crispier Chicken: Lightly spraying the breaded chicken with cooking spray helps achieve a golden, crunchy crust.
-
Adjust Heat: Vary the hot sauce and red pepper flakes to suit your spice preference.
-
Make Ahead: Chicken can be breaded and refrigerated for a few hours before baking. Bake when ready.
-
Extra Crunch: Panko breadcrumbs give the crispiest coating; try mixing in a bit of Parmesan for added flavor.
Nutrition
- Calories: 410 kcal per serving
- Fat: 18 g
- Saturated Fat: 5 g
- Carbohydrates: 28 g
- Protein: 32 g
Conclusion: Your New Go-To Dinner Masterpiece
This Baked Crunchy Hot Honey Chicken Recipe is more than just a meal; it’s a testament to the fact that you can create food that is both incredibly delicious and mindful of your well-being. It proves that you don’t need a deep fryer to achieve a satisfying, crispy texture. It’s a crowd-pleaser that will impress guests, a family-friendly dinner that will have everyone asking for seconds, and a meal prep superstar that will make your weeknights infinitely easier.
Final Thoughts
In the world of weeknight cooking, it’s a rare and beautiful thing to find a recipe that truly has it all: undeniable flavor, a satisfying texture, a health-conscious method, and straightforward instructions. This Baked Crunchy Hot Honey Chicken Recipe is precisely that—a culinary home run. It dismantles the notion that “healthy” means “bland,” delivering a dish that is unapologetically exciting and deeply comforting. By mastering the simple techniques of proper drying, firm breading, and high-heat baking, you unlock the secret to a guilt-free crunch that rivals any takeout. The hot honey sauce, a perfect balance of sweet, spicy, and tangy, is the dazzling finale that ties everything together. This recipe isn’t just a one-time meal; it’s a foundational technique you’ll return to again and again, adapting the spices and heat level to your mood. So, the next time a craving for something truly special strikes, remember that this restaurant-quality experience is waiting for you in your own kitchen. Happy cooking!