Your New Weeknight Hero: The Ultimate Quick & Easy Korean Ground Beef Bowl Recipe
Meta Description: Discover the ultimate Quick & Easy Korean Ground Beef Bowl Recipe! This comprehensive guide provides a foolproof recipe, deep dives into ingredient secrets, expert tips, and endless customization ideas for a delicious, 20-minute meal that will become a family favorite.
Introduction: Why This Quick & Easy Korean Ground Beef Bowl Recipe is a Game-Changer
Let’s be honest. Weeknights are a battlefield. The clock is ticking, stomachs are growling, and the siren call of takeout menus is growing louder by the minute. We all crave a meal that is satisfying, flavorful, and feels a little special, but one that doesn’t require a culinary degree or a three-hour time commitment. What if I told you there is a dish that exists squarely in this magical Venn diagram of convenience and deliciousness? A dish so universally loved that it pleases picky kids and adventurous foodies alike?
More breakfast ideas you’ll love
Friends, meet your new kitchen savior: the Quick & Easy Korean Ground Beef Bowl Recipe.
This isn’t just another ground beef recipe. This is a symphony of sweet, savory, salty, and subtly spicy flavors, all coming together in a single skillet in under 20 minutes. The concept is brilliantly simple: tender ground beef is sautéed and then glazed in a stunningly simple yet deeply complex-tasting sauce made from soy sauce, brown sugar, sesame oil, garlic, and ginger. It’s served over a bed of fluffy rice and topped with a confetti of fresh, crunchy vegetables. The result is a restaurant-quality meal that you can whip up on the most chaotic of Tuesday nights.
In this ultimate guide, we’re not just going to list the ingredients and instructions. We are going to embark on a deep dive into this phenomenal dish. We’ll explore the “why” behind each component, unlock professional chef tips for elevating the flavors, delve into a world of dietary adaptations, and provide a treasure trove of serving and meal prep ideas. By the end of this post, you will not only have mastered the perfect Quick & Easy Korean Ground Beef Bowl Recipe, but you will understand it so thoroughly that you can make it your own. Let’s get cooking!
Deconstructing the Magic: A Deep Dive into the Ingredients for Your Quick & Easy Korean Ground Beef Bowl
Every great recipe is built on the foundation of its ingredients. Understanding the role each one plays is the first step toward mastering the dish. This Quick & Easy Korean Ground Beef Bowl Recipe is a masterpiece of balance, where each component has a specific job.
The Foundation: The Beef and The Base
1. Ground Beef (1 lb, lean):
-
The Star of the Show: Ground beef is the ideal protein for this recipe because of its affordability, quick cooking time, and fantastic ability to absorb flavors. Its crumbled texture is perfect for creating a saucy, spoonable mixture that drapes beautifully over rice.
-
Fat Content Matters: The recipe calls for lean ground beef (90/10 or 93/7 is ideal). Why? Because excess fat can make the final dish greasy. Since we’re creating a glaze, we want the sauce to cling to the meat, not swim in pooled fat. Draining any minimal excess fat after browning is a crucial step for a pristine, non-greasy finish.
-
Alternative Proteins: The beauty of this recipe is its versatility. You can easily substitute ground beef with ground turkey, ground chicken, ground pork, or even plant-based crumbles. The cooking method remains identical.
2. Cooked Rice (2 cups):
-
The Perfect Canvas: Rice is the neutral, comforting base that soaks up the incredible sauce and brings the whole bowl together. It provides a soft textural contrast to the savory beef and crunchy toppings.
-
Your Rice, Your Rules: The type of rice is entirely up to you!
-
White Rice (Jasmine or Short-Grain): Offers a sticky, slightly sweet flavor that is classic and beloved.
-
Brown Rice: Provides a nuttier flavor and a boost of fiber and nutrients, making the bowl even more wholesome.
-
Cauliflower Rice: A fantastic low-carb and keto-friendly option. For the best texture, sauté it separately to evaporate any moisture before serving.
-
The Soul: The Incredibly Simple Sauce
This is where the magic happens. With just a handful of pantry staples, you create a sauce that tastes like it simmered for hours.
1. Soy Sauce (1/4 cup):
-
The Salty, Umami Backbone: Soy sauce is the foundational flavor, providing a deep, savory, and complex saltiness known as umami. It’s what gives the beef its rich, meaty depth.
-
Low-Sodium is Your Friend: I highly recommend using low-sodium soy sauce. This gives you control over the salt level of the final dish, especially since the sauce reduces and concentrates. You can always add a pinch of salt at the end if needed, but you can’t take it away.
2. Brown Sugar (3 tablespoons):
-
The Sweet Caramelized Glaze: Brown sugar is the perfect counterpoint to the salty soy sauce. It doesn’t just add sweetness; it creates a gorgeous, slightly sticky glaze that coats the beef. The molasses in the brown sugar also contributes a subtle caramel and toffee note that white sugar simply can’t replicate.
3. Sesame Oil (1 tablespoon):
-
The Aromatic Finisher: This is the secret weapon. Toasted sesame oil has an intensely nutty, aromatic flavor that is unmistakably Asian. It’s a finishing oil, meaning its complex flavor is best preserved when added at the end of cooking, rather than used for sautéing. That one tablespoon infuses the entire dish with its signature fragrance.
4. Fresh Garlic (3 cloves, minced) & Fresh Ginger (1 teaspoon, minced):
-
The Flavor Powerhouses: This dynamic duo is non-negotiable for an authentic and vibrant taste.
-
Garlic provides a pungent, aromatic kick that forms the base of the flavor profile.
-
Ginger adds a warm, zesty, and slightly spicy freshness that cuts through the richness of the beef and sugar.
-
-
Fresh vs. Ground/Powdered: The recipe calls for fresh, and for good reason. The flavor of fresh garlic and ginger is brighter, more potent, and more complex than their dried, powdered counterparts. Using fresh will make a noticeable difference in the final dish. A microplane is the perfect tool for mincing both to a fine paste.
5. Crushed Red Pepper Flakes (1/2 teaspoon, optional):
-
The Gentle Heat: This is your dial for spice. A half-teaspoon provides a gentle, warming background heat that builds with each bite. For a mild dish, you can omit it entirely. For those who love spice, feel free to ramp it up to a full teaspoon or even add a drizzle of Sriracha or Gochujang at the end.
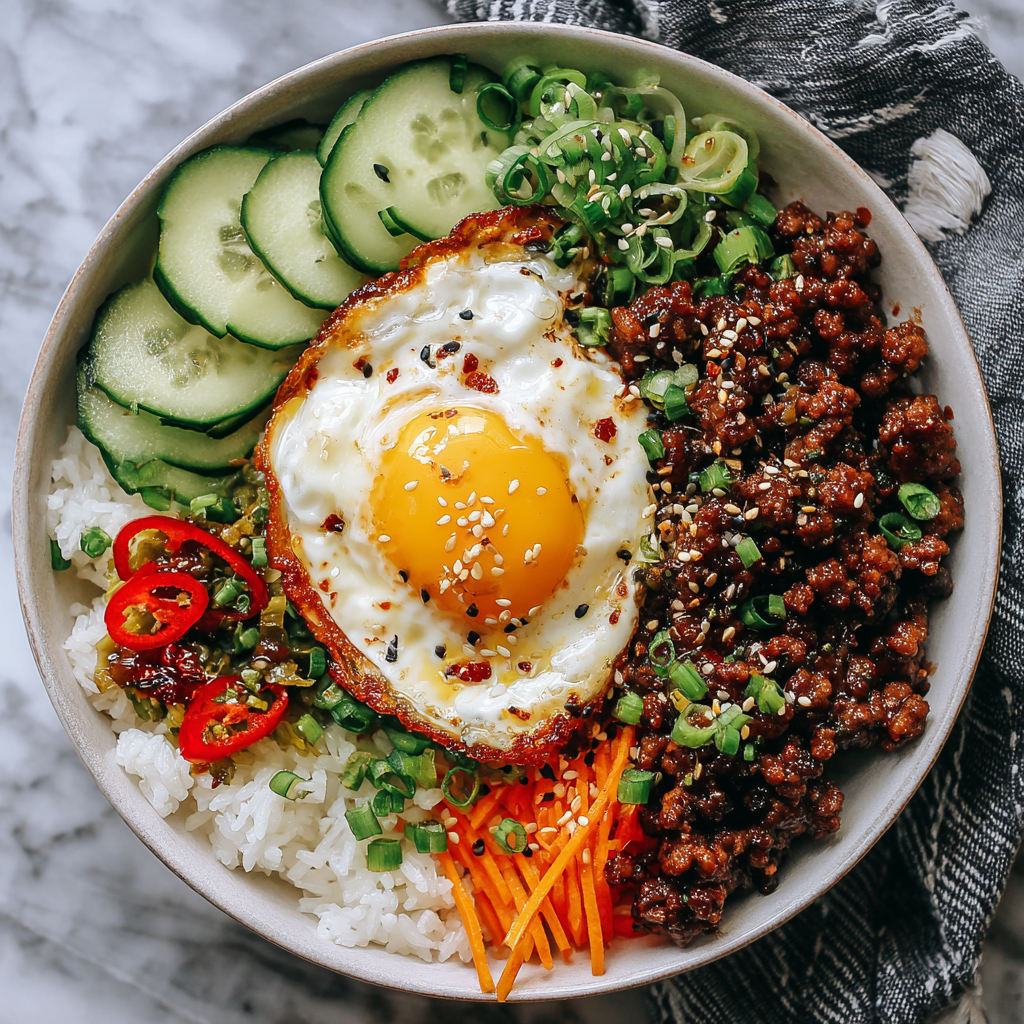
The Grand Finale: Toppings and Garnishes
Toppings are not just an afterthought; they are essential for creating a balanced and texturally exciting bowl. They add color, freshness, crunch, and contrast.
-
Green Onions: A sprinkle of thinly sliced green onions adds a sharp, fresh, oniony bite and a pop of green color.
-
Sesame Seeds: Toasted white or black sesame seeds contribute a delightful nutty crunch and visual appeal.
-
Shredded Carrots: They add a sweet crunch and a vibrant orange color.
-
Cucumber Slices: Cool, crisp, and refreshing, cucumber is the perfect palate cleanser against the rich beef.
-
Other Fantastic Options: Think about sliced radishes, pickled red onions, a handful of fresh spinach, or even some kimchi for a fermented, spicy kick.
The Foolproof, Step-by-Step Instructions for Your Quick & Easy Korean Ground Beef Bowl
Now that we understand the “why,” let’s get into the “how.” Follow these detailed steps for a perfectly executed dish every single time.
Step 1: The Foundation – Cooking the Rice
This step is listed first because it’s the one thing you need to have ready before you start the beef. There’s nothing worse than having your delicious beef ready and waiting for a pot of rice that’s still 15 minutes away.
-
If using white or brown rice, cook it according to the package directions. A rice cooker is a fantastic, set-it-and-forget-it tool. Aim for fluffy, distinct grains.
-
If using cauliflower rice, I recommend sautéing it in a separate pan with a tiny bit of oil for 5-7 minutes until it’s tender and any excess moisture has cooked off. This prevents it from becoming soggy.
Step 2: The Main Event – Browning the Beef
-
Heat Your Skillet: Place a large skillet or frying pan over medium-high heat. No oil is needed at this stage if you’re using lean ground beef, as it will render its own fat.
-
Cook the Beef: Add the 1 lb of lean ground beef to the hot skillet. Use a wooden spoon or spatula to break it up into small, crumbled pieces. The goal is an even, fine crumble that will hold the sauce beautifully.
-
Cook Through: Continue cooking, stirring occasionally, until the beef is fully browned and no pink remains. This should take about 5-7 minutes.
-
Drain the Fat: This is a critical step for a non-greasy sauce. Carefully tilt the skillet and use a spoon to skim off and discard any excess rendered fat, or pour the beef into a colander to drain it. Return the drained beef to the skillet.
Step 3: The Aromatics – Building the Flavor Base
-
Reduce the Heat: Lower the heat to medium. We’re now moving from browning to sautéing, and we don’t want to burn our delicate aromatics.
-
Add Garlic and Ginger: Add the 3 cloves of minced garlic and 1 teaspoon of minced fresh ginger to the skillet with the beef. Sauté, stirring constantly, for about 60-90 seconds. You’ll know it’s ready when the kitchen is filled with an incredible, fragrant aroma. Be careful not to burn the garlic, as it will turn bitter.
Step 4: The Transformation – Creating the Glaze
-
Combine the Sauce: To the skillet, add the 3 tablespoons of brown sugar, 1/4 cup of soy sauce, 1 tablespoon of sesame oil, and the optional 1/2 teaspoon of crushed red pepper flakes. Stir everything together until the beef is evenly coated and the brown sugar has completely dissolved.
-
Simmer and Merge: Allow the mixture to come to a gentle simmer. Let it cook for 2-3 minutes, stirring occasionally. During this time, the sauce will thicken slightly, reduce, and transform into a glossy, caramel-like glaze that clings to every morsel of beef. The entire skillet will smell absolutely divine.
Step 5: The Assembly – Building Your Perfect Bowl
-
Base Layer: Divide the 2 cups of cooked rice between two bowls (or four if you’re serving smaller portions).
-
The Star: Spoon the hot, glazed Korean ground beef generously over the rice.
-
The Crown: Now, the fun part! Artfully arrange your chosen toppings. A shower of green onions, a sprinkle of sesame seeds, a small mound of shredded carrots, and a few cool cucumber slices.
-
Serve Immediately: This dish is best enjoyed hot, right out of the pan, when the contrasts in temperature and texture are at their peak.
Pro Chef Secrets: How to Elevate Your Quick & Easy Korean Ground Beef Bowl Recipe
You now have the blueprint for a fantastic dish. But if you want to take it from “great” to “absolutely extraordinary,” incorporate these professional tips.
1. The “Blooming” Trick for Ground Ginger:
What if you only have ground ginger? Don’t worry, you can still maximize its flavor. Before adding the other sauce ingredients, sprinkle the 1/2 teaspoon of ground ginger directly onto the cooked beef and aromatics. Let it toast for 15-20 seconds. This “blooms” the spices, releasing their essential oils and creating a much deeper, more authentic flavor than simply stirring it into the liquid sauce.
2. The Mirin Twist:
For an added layer of complex sweetness and a beautiful shine, add one tablespoon of mirin (a sweet Japanese rice wine) to the sauce along with the other ingredients. It adds a subtle acidity and depth that is truly restaurant-quality.
3. The Gochujang Boost:
If you’re a fan of Korean food, you likely have a tub of gochujang (Korean chili paste) in your fridge. Swap the red pepper flakes for 1-2 teaspoons of gochujang. It will add a deeper, fermented, sweet-spicy flavor that is the heart of so many Korean dishes. Thin it out with a bit of the soy sauce before adding it to the skillet to ensure it incorporates smoothly.
4. The Perfect Sear on Your Beef:
Avoid the temptation to constantly stir the beef as it first hits the pan. Let it sit for a minute to develop a bit of a sear on one side before you start breaking it up. This Maillard reaction (the chemical reaction that creates browning) adds a richer, more complex meaty flavor to the entire dish.
5. Toast Your Sesame Seeds:
If you’re using raw sesame seeds, toast them in a dry pan over medium heat for 2-3 minutes until they are fragrant and lightly golden. This simple step exponentially increases their nutty flavor and crunch.
Beyond the Basics: Customization and Dietary Adaptations
The true test of a great recipe is its flexibility. This Quick & Easy Korean Ground Beef Bowl Recipe is a chameleon, ready to adapt to your dietary needs and flavor whims.
Dietary-Friendly Variations:
-
Gluten-Free: This is an incredibly easy switch. Simply ensure you use a certified gluten-free soy sauce (like tamari) or coconut aminos.
-
Paleo/Whole30: Use coconut aminos instead of soy sauce, and replace the brown sugar with an equal amount of coconut sugar or date paste. Make sure to serve it over cauliflower rice.
-
Low-Carb/Keto: Use a brown sugar substitute that measures 1:1 like erythritol or monk fruit blend. The sauce will be slightly less glazy but just as flavorful. Serve over cauliflower rice.
-
Vegetarian/Vegan: Substitute the ground beef with a plant-based ground “meat” crumble, crumbled extra-firm tofu, or even cooked lentils. The sauce works beautifully with all of them.
Flavor & Ingredient Twists:
-
Bulgogi-Style: Add 1/4 of a grated Asian pear or a quarter of a grated apple to the sauce. The natural enzymes tenderize the meat (if marinated) and add a subtle, fruity sweetness.
-
Spicy Kimchi Edition: Stir in 1/2 cup of chopped kimchi during the last minute of cooking for a tangy, spicy, fermented kick.
-
“Cheeseburger” Fusion: Sounds wild, but it works! After simmering the sauce, top the beef with a handful of shredded cheddar or American cheese, cover the skillet until melted, and serve. It’s a bizarrely delicious fusion.
-
Add More Veggies: You can bulk up the nutrition by adding finely diced bell peppers, onions, or zucchini to the skillet when you cook the beef.
The Art of Meal Prep: Your Weekly Lunch Solution
This Quick & Easy Korean Ground Beef Bowl Recipe isn’t just a weeknight dinner hero; it’s a meal prep superstar. The flavors actually improve as they mingle in the fridge, making it the perfect make-ahead lunch.
How to Meal Prep It:
-
Cook a Double Batch: The recipe doubles (or even triples) perfectly. Simply use a larger skillet or cook in batches.
-
Cool Completely: Allow the cooked beef and rice to cool completely to room temperature before packaging. This is crucial for food safety and prevents condensation from making your rice mushy.
-
Package Smartly:
-
Method 1 (Mixed): Portion the beef and rice together in airtight containers. This is the fastest for grabbing and going.
-
Method 2 (Layered): Keep the components separate. Place rice at the bottom of the container, then the beef, and keep the fresh toppings (like cucumbers and green onions) in a small separate bag or container. This preserves the textures best.
-
-
Storage: Store in the refrigerator for up to 4 days.
-
Reheating: Reheat in the microwave for 1.5-2 minutes, stirring halfway through. If the rice seems dry, sprinkle a teaspoon of water over it before reheating.
The Perfect Pairings: What to Serve With Your Korean Beef Bowl
While this bowl is a complete meal in itself, a few simple side dishes can turn it into a true feast.
-
The Quintessential Side: Kimchi. A small bowl of spicy, fermented kimchi is the traditional and perfect accompaniment. Its crunchy, tangy, spicy profile cuts through the richness of the beef beautifully.
-
A Simple Soup: Korean Radish Soup (Mu-guk). A light, clean broth-based soup with radish and green onion is a classic way to start a Korean meal and complements the bowl wonderfully.
-
A Refreshing Salad: A simple side salad with a ginger-sesame vinaigrette (whisk together rice vinegar, sesame oil, a little soy sauce, and grated ginger) provides a fresh, acidic counterpoint.
-
The Ultimate Topper: The Fried Egg. As mentioned in the original tips, a perfectly fried egg with a runny yolk is a game-changer. Place it right on top of the beef, and as you break the yolk, it creates an impossibly rich, silky sauce that coats everything.
Frequently Asked Questions (FAQ)
Q1: Can I make this Korean ground beef bowl in advance?
A: Absolutely! As detailed in the meal prep section, it keeps beautifully in the fridge for up to 4 days. The flavors meld and often taste even better the next day.
Q2: Can I freeze this dish?
A: Yes, you can freeze the beef component. Allow it to cool completely, then store it in a freezer-safe container or bag for up to 3 months. Thaw overnight in the refrigerator before reheating. I do not recommend freezing the assembled bowls with rice, as the rice can become grainy and mushy upon thawing.
Q3: My sauce didn’t get thick and glazy. What happened?
A: This usually happens for one of two reasons: 1) There was too much liquid/fat in the pan after cooking the beef. Ensure you drain it well. 2) It needed more simmering time. Let it bubble over medium heat for another minute or two, and the sauce will reduce and thicken.
Q4: Is this recipe authentic Korean?
A: This recipe is what is often called “Korean-inspired.” It captures the essential sweet, savory, and garlicky-ginger flavors of dishes like Korean BBQ (Bulgogi) but simplifies them for speed and accessibility using common Western pantry ingredients like ground beef and brown sugar. It’s a fantastic introduction to Korean flavors.
Q5: What’s the best way to mince garlic and ginger?
A: A microplane zester/grater is the best tool. It creates a fine paste that disperses its flavor throughout the dish seamlessly. Alternatively, you can use a fine grater or press the garlic with a garlic press.
Your New Weeknight Hero: The Ultimate Quick & Easy Korean Ground Beef Bowl Recipe

This Korean Ground Beef Bowl is your new go-to for fast, flavorful dinners! Juicy beef simmered in a sweet-salty soy glaze with garlic, ginger, and sesame oil—served over fluffy rice and topped with crisp veggies. It’s quick, wholesome, and bursting with umami flavor in every bite. Perfect for busy nights or easy meal prep that actually tastes amazing.
- Prep Time: 5 min
- Cook Time: 15 minutes
- Total Time: 20 minutes
Ingredients
-
1 lb lean ground beef
-
3 tbsp brown sugar
-
¼ cup soy sauce (use low-sodium if preferred)
-
1 tbsp sesame oil
-
3 cloves garlic, minced
-
1 tsp fresh ginger (or ½ tsp ground ginger)
-
½ tsp crushed red pepper flakes (optional)
-
2 cups cooked rice (white, brown, or cauliflower)
Optional Toppings:
Green onions, sesame seeds, shredded carrots, cucumber slices
Instructions
-
Brown the beef: In a large skillet over medium heat, cook the ground beef until no longer pink. Drain excess fat.
-
Add aromatics: Stir in minced garlic and ginger; cook 1 minute until fragrant.
-
Make it saucy: Add brown sugar, soy sauce, sesame oil, and red pepper flakes. Stir well and let simmer 2–3 minutes to let the sauce thicken and coat the beef.
-
Assemble: Spoon the beef over warm rice and finish with your favorite toppings—green onions, sesame seeds, and crunchy veggies.
Notes
Add a fried egg on top for a rich, Korean-inspired twist that takes it to the next level!
Nutrition
- Calories: 420kcal per serving
Conclusion: Your Go-To Recipe for Flavor and Ease
In the world of cooking, true gems are recipes that deliver maximum flavor with minimal effort, that are reliable, customizable, and bring genuine joy to the table. This Quick & Easy Korean Ground Beef Bowl Recipe is precisely that—a gem.
It has earned its place in the regular rotation of countless households for a reason. It’s the answer to the “what’s for dinner?” question on a busy night. It’s the solution for a satisfying and impressive lunch. It’s a dish that welcomes experimentation and adapts to your life.
So, the next time you feel that weeknight pressure starting to build, remember this recipe. In the 20 minutes it takes for the rice to cook, you can transform a pound of ground beef and a few simple ingredients into a vibrant, delicious, and deeply satisfying meal that will have everyone asking for seconds. Print it, bookmark it, and commit it to memory. This is one recipe you’ll be glad to have in your arsenal for years to come.