The Ultimate Guide to Perfect Crispy Baked Chicken Tenders: A Healthier Family Favorite
If there’s one dish that universally promises comfort, satisfaction, and pure culinary joy, it’s a perfectly cooked chicken tender. That golden, crunchy exterior giving way to juicy, tender chicken inside is a texture and flavor combination that’s hard to beat. Today, we’re diving deep into the art and science of creating the perfect Crispy Baked Chicken Tenders—a version that delivers all the crave-worthy crunch of the classic fried favorite but in a lighter, healthier, and more convenient baked form. This comprehensive guide will walk you through everything from selecting ingredients to expert techniques, ensuring your homemade tenders are nothing short of spectacular every single time.
Why Crispy Baked Chicken Tenders Deserve a Spot in Your Recipe Repertoire
Let’s be honest: frozen store-bought tenders or fast-food versions often leave us wanting. They can be soggy, bland, or filled with unnecessary additives. Homemade Crispy Baked Chicken Tenders put you firmly in the driver’s seat. You control the quality of the chicken, the seasoning in the breading, and the cooking method. Baking, as opposed to deep-frying, significantly reduces the amount of oil and fat without sacrificing that essential crispiness we all love. This makes them a fantastic option for a quick weeknight dinner, a surefire hit for kids (and adults!) at a family meal, an excellent component for meal prepping, and even a crowd-pleasing appetizer for game day.
More breakfast ideas you’ll love
The beauty of this recipe lies in its simplicity and adaptability. With a prep time of just 10 minutes and a cook time of 20 minutes, you can have a delicious, protein-packed meal on the table in half an hour. The ingredient list is straightforward, often consisting of pantry staples, yet the result feels special and indulgent.
A Detailed Look at the Ingredients for Crispy Baked Chicken Tenders
Every component in this recipe plays a specific role in building the ultimate texture and flavor. Let’s break it down:
For the Chicken:
-
1 lb chicken breasts or chicken tenders: This is your canvas. Chicken tenders (the tenderloin strip) are naturally portioned and incredibly tender. Chicken breasts, cut into 1-inch strips, work perfectly and are often more economical. For the juiciest results, I recommend using chicken tenderloins if available.
For the Breading Station:
-
2 large eggs, beaten: The essential “glue.” Eggs help the dry breadcrumb mixture adhere to the chicken, creating a solid foundation for the crispy crust.
-
1 cup panko breadcrumbs: This is the secret weapon for extra-crispy baked chicken tenders. Panko, a Japanese-style breadcrumb, is flakier and airier than traditional fine breadcrumbs. It absorbs less oil and moisture, resulting in a lighter, crispier, and less greasy coating that holds up beautifully in the oven. Regular breadcrumbs can be used for a denser, more traditional coating.
-
½ cup grated Parmesan cheese (optional): While listed as optional, I highly recommend it. Parmesan adds a deep, savory, umami flavor to the crust and helps it brown beautifully. It also contributes to the crispy texture.
-
The Spice Blend (1 tsp garlic powder, 1 tsp paprika, ½ tsp onion powder, ½ tsp salt, ¼ tsp black pepper): This is where you build flavor. Garlic and onion powder provide a savory base, paprika adds a subtle sweetness and gorgeous color, and salt & pepper are non-negotiable for seasoning. This blend is classic and crowd-pleasing.
The Finishing Touch:
-
Olive oil spray: A light spritz of oil is crucial. It helps the panko brown and crisp in the dry heat of the oven, mimicking the effect of frying. You can use any neutral cooking spray.
Step-by-Step Mastery: How to Make Irresistibly Crispy Baked Chicken Tenders
Follow these detailed instructions and pro-tips to achieve bakery-level perfection at home.
Step 1: Prep the Chicken
If using chicken breasts, place them on a cutting board and slice them evenly into 1-inch wide strips. Try to make them as uniform as possible so they cook at the same rate. Pat the chicken strips completely dry with paper towels. This is a critical step! Excess moisture is the enemy of crispiness; a dry surface allows the breading to stick properly.
Step 2: Prepare the Breading Stations
Set up a standard breading assembly line. This keeps the process clean and efficient.
-
Station 1: In a shallow bowl or dish, beat the two eggs until smooth.
-
Station 2: In another shallow bowl, combine the panko, Parmesan cheese (if using), garlic powder, paprika, onion powder, salt, and black pepper. Use a fork or whisk to ensure the spices are evenly distributed throughout the breadcrumbs.
Step 3: Season the Chicken
Lightly season the dried chicken tenders with a small pinch of salt and pepper. This seasons the meat itself, not just the coating.
Step 4: Bread the Chicken – The Key to a Great Crust
This is a three-finger operation: one hand for dry ingredients, one for wet, and one to keep clean.
-
Dip: Using your designated “wet” hand, pick up a chicken tender and fully submerge it in the beaten egg. Let the excess drip off for a few seconds back into the bowl.
-
Coat: Transfer the eggy tender to the breadcrumb mixture. With your designated “dry” hand, scoop the crumbs over the top and press down gently but firmly. This pressing action is what ensures a thick, even, cohesive coating that won’t fall off during baking. Ensure all sides are covered.
-
Pro-Tip for Extra Crunch: For the crispiest baked chicken tenders imaginable, consider a double coat. After the first breading, dip the tender back into the egg and then into the breadcrumbs for a second time. This builds an extra-thick, shaggy layer that bakes up into serious crunch.
Step 5: Prepare the Baking Sheet for Maximum Crispiness
Do not simply place breaded tenders on a bare pan. Here are your options, ranked from good to best:
-
Good: Line a baking sheet with parchment paper or a silicone baking mat. This prevents sticking and allows for easy cleanup, but the bottom of the tender can steam slightly.
-
Best: Place a wire rack on top of your lined baking sheet. Arranging the Crispy Baked Chicken Tenders on a wire rack is a game-changer. It allows hot air to circulate completely around the tender, cooking and crisping it evenly on all sides. No more flipping halfway through? No soggy bottoms? Yes, please!
Step 6: Bake to Perfection
-
Preheat: Always preheat your oven to a full 400°F (200°C). A hot oven is essential for immediate sizzle and proper cooking.
-
The Oil Spray: Just before the tenders go in the oven, give them a generous, even spray with olive oil. This fine mist will make the panko golden and delicious.
-
Bake: Bake for 10-12 minutes, then carefully flip each tender. Spray the second side lightly with oil. Continue baking for another 8-10 minutes, until the coating is a deep, golden brown and the chicken is cooked through.
-
The Final Test: The most reliable method is to use an instant-read meat thermometer. Insert it into the thickest part of a tender; it should read 165°F (74°C). At this temperature, the chicken is perfectly safe to eat and will remain juicy.
Step 7: Serve and Enjoy!
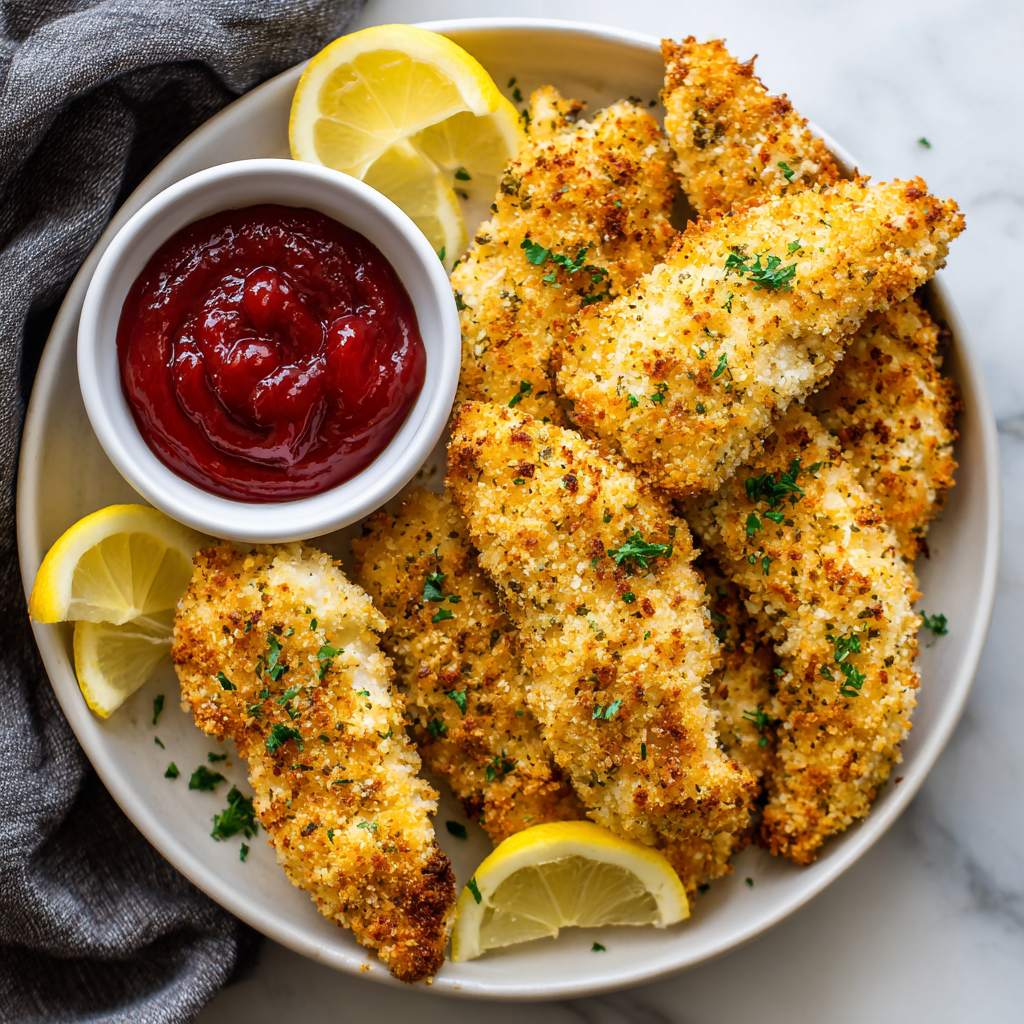
Remove your masterpiece from the oven and let the Crispy Baked Chicken Tenders rest on the rack for 3-5 minutes. This allows the juices to redistribute within the chicken and the crust to set, becoming even crispier. Then, serve immediately with a variety of dipping sauces.
Elevating Your Crispy Baked Chicken Tenders: Dipping Sauces & Serving Ideas
The perfect tender deserves the perfect dip. Here are some classic and creative pairings:
-
Honey Mustard: The sweet and tangy classic.
-
Ranch Dressing: Cool, creamy, and always a winner.
-
BBQ Sauce: Smoky and sweet.
-
Sriracha Mayo: For a creamy kick of heat.
-
Marinara Sauce: A nod to chicken Parmesan flavors.
Serving Ideas for a Complete Meal:
-
The Classic Plate: Serve with crispy oven fries (or sweet potato fries) and a simple side salad.
-
In a Wrap or Sandwich: Pile them into a soft bun or wrap with lettuce, tomato, and your favorite sauce.
-
On a Salad: Slice them and add to a fresh garden salad for a hearty protein boost.
-
For Meal Prep: Let cooked tenders cool completely, then store in an airtight container in the fridge for up to 4 days. Reheat in an air fryer or toaster oven to maintain crispness (a microwave will make them soft).
The Ultimate Guide to Perfect Crispy Baked Chicken Tenders: A Healthier Family Favorite
These Crispy Baked Chicken Tenders are everything you love about the classic fried version—tender strips of chicken with a crunchy golden coating—but made lighter and easier right in the oven. Perfect for weeknight meals, kid-friendly dinners, and meal prep, this recipe is simple, delicious, and guaranteed to disappear fast!
Ingredients
-
1 lb chicken breasts or chicken tenders, cut into strips
-
2 large eggs, beaten
-
1 cup panko breadcrumbs (or regular breadcrumbs)
-
½ cup grated Parmesan cheese (optional, for flavor + extra crispiness)
-
1 tsp garlic powder
-
1 tsp paprika
-
½ tsp onion powder
-
½ tsp salt
-
¼ tsp black pepper
-
Olive oil spray, for coating
Instructions
1️⃣ Prep the Chicken
Slice into 1-inch strips if using whole chicken breasts.
2️⃣ Prepare Breading Stations
-
Bowl 1: Beaten eggs
-
Bowl 2: Panko + Parmesan + garlic powder + paprika + onion powder + salt + pepper
3️⃣ Season + Bread
Lightly season chicken with salt + pepper.
Dip strips into egg → breadcrumb mixture.
Optional: Double-coat for extra crunch.
4️⃣ Arrange on Baking Sheet
Line baking sheet with parchment or place a wire rack on top for max crispiness.
Spray lightly with olive oil.
5️⃣ Bake
Bake at 400°F (200°C) for 20–25 minutes, flipping halfway.
Internal temp should reach 165°F (74°C).
6️⃣ Serve
Let rest briefly, then plate with favorite dipping sauces like:
-
Ranch
-
Honey mustard
-
BBQ sauce
-
Ketchup for kids 🍟
Notes
-
Add cayenne or chili powder for spice.
-
Use gluten-free breadcrumbs for a GF version.
-
Air fryer option:
400°F for 10–12 minutes, flipping once.
Final Thoughts on Crispy Baked Chicken Tenders
Mastering the art of Crispy Baked Chicken Tenders is more than just following a recipe; it’s about embracing a technique that yields delicious, healthier results you can feel good about serving. This recipe proves that you don’t need a deep fryer to achieve a satisfying, crunchy texture. The combination of the right breadcrumb (panko), a flavorful seasoning blend, the wire rack method, and that essential spritz of oil creates a baked tender that truly rivals its fried counterpart.
What makes these Crispy Baked Chicken Tenders so special is their versatility and universal appeal. They are simple enough for a busy Tuesday night, yet impressive enough for casual entertaining. They cater to both the nutrition-conscious and the flavor-obsessed. By making them at home, you’re not just preparing dinner; you’re creating a wholesome, customizable meal that brings everyone to the table.
So, the next time a craving for that perfect crunch strikes, skip the drive-thru or the frozen aisle. In just 30 minutes with a handful of simple ingredients, you can create a batch of golden, juicy, Crispy Baked Chicken Tenders that will have everyone asking for seconds—and the recipe. Happy cooking