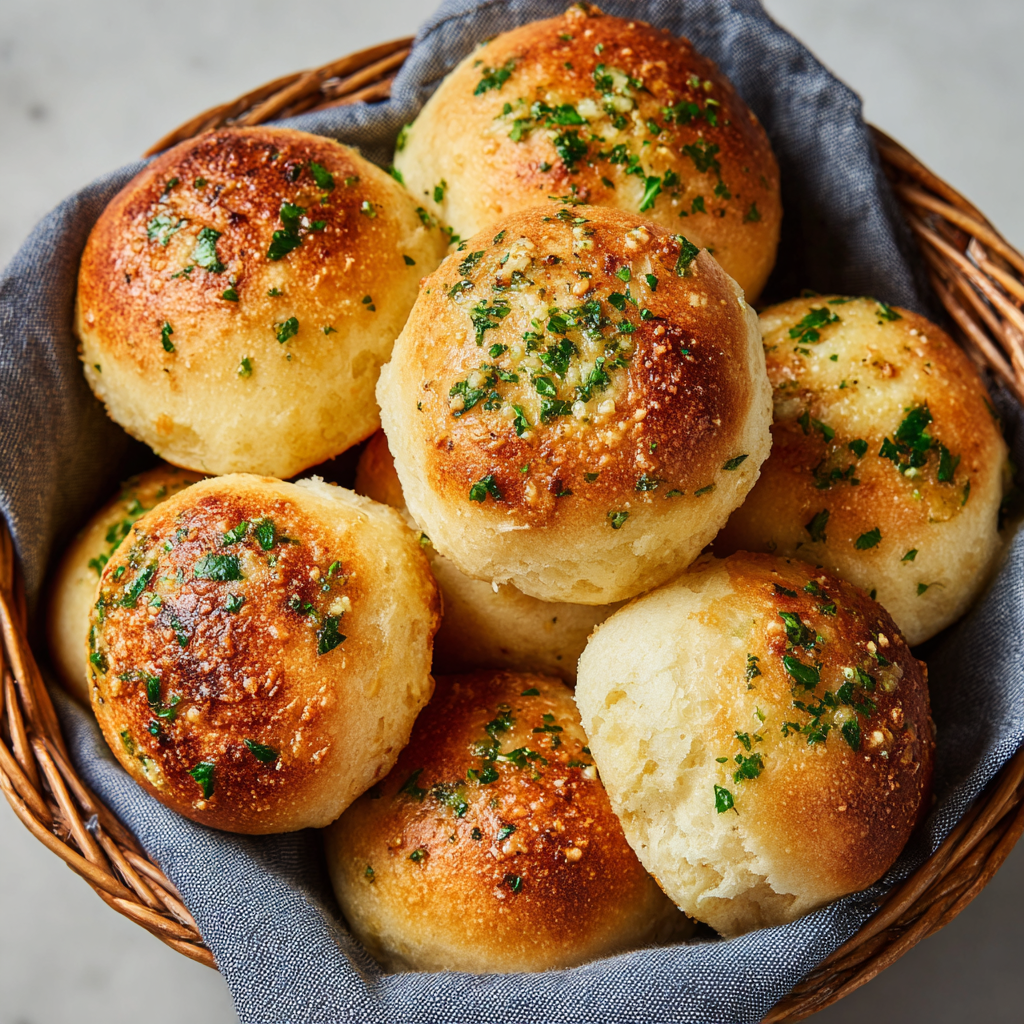
Garlic Bread Rolls: The Ultimate Guide to Baking Soft, Garlicky Perfection
There’s a special kind of magic that happens when the humble dinner roll meets the bold, aromatic embrace of garlic. The result? Garlic Bread Rolls. These aren’t just a side dish; they are the star of the table, a fragrant, buttery, pull-apart cloud of comfort that turns any meal into a feast. In this comprehensive guide, we’ll dive deep into the art and science of creating the perfect homemade garlic bread rolls, from the chemistry of the dough to the final, glorious brush of garlic-herb butter. Whether you’re a seasoned baker or a kitchen novice, this post will equip you with everything you need to master this beloved recipe.
Why Garlic Bread Rolls Deserve a Place at Your Table
Before we get our hands floury, let’s talk about why these rolls are worth the effort. Unlike store-bought versions or simple garlic toast, homemade garlic bread rolls are a multi-sensory experience. The flavor is baked into the very fiber of the roll, not just slathered on top. This creates a harmonious, layered garlic experience that is both subtle and profound. They are incredibly versatile, serving as the perfect appetizer to calm hungry crowds, an essential side for pasta nights, soups, and salads, or even the foundation for next-level sliders and sandwiches.
More breakfast ideas you’ll love
The recipe we’re focusing on today promises soft, fluffy rolls packed with fresh garlic in the dough and finished with a decadent garlic butter glaze. It’s a two-punch garlic technique that ensures every bite is infused with flavor.
The Science of Softness: Decoding the Dough
The foundation of any great roll is its dough. For garlic bread rolls, we aim for a rich, tender crumb that can stand up to the robust flavor of garlic without becoming dense.
Key Ingredients & Their Roles:
-
Flour (All-Purpose): The structure-builder. We use 3 1/2 cups + 1 tablespoon, measured correctly. The most crucial tip for baking is to measure your flour by weight (434g) using a kitchen scale. If measuring by volume, fluff your flour, spoon it into the cup, and level it off. This prevents a dry, tough dough.
-
Instant Yeast: The life force. At 2 1/4 teaspoons, it provides a reliable and quick rise without the need for proofing in water first.
-
Sugar: Just one tablespoon feeds the yeast, promotes browning, and balances the savory notes.
-
Fat (Butter & Egg): The tenderness agents. Butter (4 1/2 tablespoons) enriches the dough and contributes to flavor and a soft texture. The egg adds richness, color, and helps bind the ingredients.
-
Liquid (Warm Milk): Using whole or 2% milk, warmed to 110°F (43°C), creates a more tender crumb than water. The warmth gently wakes up the yeast.
-
The Garlic Foundation: Here’s the first flavor layer. We gently cook 2 tablespoons of minced garlic in the butter before adding it to the dough. This step mellows the raw bite of garlic and disperses its flavor evenly throughout the fat, which then gets kneaded into every inch of the dough.
The Kneading Process: A stand mixer with a dough hook is a baker’s best friend here. The goal is to knead for 10-12 minutes on low speed until the dough is “smooth, soft, and tacky.” Tacky is different from sticky—it should feel like it might just stick to your finger but pulls away cleanly. This develops the gluten network, which is essential for trapping gas from the yeast and giving the rolls their beautiful, airy structure.
Shaping, Rising, and the Art of Patience
Once your dough is silky and elastic, it’s time to shape your garlic bread rolls.
-
Dividing: For uniform baking, divide the dough into 12 equal pieces. Using a digital scale (aim for about 67g each) is the secret to professional-looking results.
-
Shaping: To create that classic, smooth dinner roll top, cup each piece of dough in your hand and roll it on an un-floured surface using a circular motion, tucking the edges underneath to create tension. Pinch the bottom seam to seal. This technique ensures a tight, round ball that will rise upward, not just outward.
-
The Pan & The Rise: A lightly buttered 9×13 inch pan is the perfect home. Place the shaped rolls snugly but not crammed together. Cover with plastic wrap or a damp kitchen towel. Now, the test of patience: the rise. Let them rest in a warm, draft-free spot until doubled in size. This can take 1-2 hours, depending on your kitchen’s temperature. Don’t rush this! A full rise is non-negotiable for light, fluffy rolls.
Baking to Golden Perfection
Preheat your oven to a moderate 350°F (180°C). A hotter oven might brown the tops too quickly before the insides are cooked. Just before baking, give the rolls an egg wash (a beaten egg brushed on top). This is the baker’s trick for achieving a deep, glossy, golden-brown crust that’s picture-perfect.
Bake for 20-30 minutes. The rolls are done when they sound hollow when tapped on the bottom and the tops are a rich golden brown. Ovens vary, so start checking at the 20-minute mark.
The Grand Finale: The Garlic Butter Bath
While the rolls bake, prepare the second, powerful layer of garlic flavor: the finishing butter. Melt 2 tablespoons of butter with another tablespoon of minced garlic, cooking just until fragrant. Off the heat, stir in fresh parsley. The moment the garlic bread rolls emerge from the oven, lavish them with this garlic butter. The hot rolls will act like a sponge, soaking up all that herby, garlicky goodness. A final sprinkle of flaky sea salt adds a delightful crunch and enhances all the flavors.
PrintGarlic Bread Rolls: The Ultimate Guide to Baking Soft, Garlicky Perfection

These garlic bread rolls are soft, fluffy, and packed with garlic flavor. Perfect as a side for pasta, soups, or a holiday dinner, they’re made with fresh garlic in the dough and brushed with extra garlic butter right after baking for maximum flavor.
Ingredients
For the Dough:
-
4 1/2 Tbsp (60 g) unsalted butter
-
2 Tbsp minced garlic
-
3 1/2 cups + 1 Tbsp (434 g) all-purpose flour
-
3 Tbsp chopped fresh parsley
-
1 Tbsp (15 g) granulated sugar
-
2 1/4 tsp instant yeast
-
1 tsp fine sea salt
-
1 cup (225 g) whole or 2% milk, warmed to 110°F
-
1 large egg, room temperature
-
1 beaten egg (for brushing tops)
For the Garlic Butter:
-
2 Tbsp (28 g) unsalted butter
-
1 Tbsp minced garlic
-
1 Tbsp chopped fresh parsley
-
Flaky sea salt, for sprinkling
Instructions
-
Prepare Pan & Garlic Butter for Dough:
Lightly butter a 9×13-inch baking pan. Melt 4 1/2 Tbsp butter in a small pot, add 2 Tbsp minced garlic, cook 1–2 minutes until fragrant, then remove from heat to cool. -
Make the Dough:
In a mixing bowl, combine flour, parsley, sugar, yeast, and salt. Add the warmed milk, egg, and garlic butter. Knead with a dough hook on low speed for 10–12 minutes until smooth and soft. If dough is sticky, add 1 Tbsp flour at a time. -
Shape Rolls:
Divide dough into 12 equal portions (≈67 g each). Shape into smooth balls and pinch the bottom seam. Place in prepared pan, cover with plastic wrap or a towel, and let rise in a warm spot until doubled (1–2 hours). -
Bake:
Preheat oven to 350°F (180°C). Brush rolls with beaten egg. Bake 20–30 minutes until tops are golden brown. -
Prepare Garlic Butter:
While rolls bake, melt 2 Tbsp butter with 1 Tbsp garlic for 1–2 minutes until fragrant. Remove from heat, stir in parsley. -
Finish & Serve:
Brush warm rolls with garlic butter immediately after baking. Sprinkle with flaky sea salt and serve warm.
Notes
-
Rising: Place the dough in a slightly warm, draft-free area to rise faster.
-
Garlic Flavor: Use fresh garlic for the best taste; roasted garlic can also add a sweeter flavor.
-
Storage: Store leftovers in an airtight container for 2–3 days or freeze for up to 1 month. Reheat in the oven to keep them soft.
Pro Tips & Troubleshooting for Your Garlic Bread Rolls
-
Fresh is Best: Use fresh garlic, not jarred or powdered, for the brightest, truest flavor.
-
Herb Variations: While parsley is classic, feel free to experiment. Fresh chopped chives, thyme, or a teaspoon of dried Italian seasoning can add a wonderful twist.
-
Dough Too Sticky? The recipe advises adding flour one tablespoon at a time if needed. Remember, a slightly tacky dough is better than a dry one.
-
Make-Ahead Magic: You can shape the rolls, cover the pan tightly, and refrigerate overnight for a slow, cold rise. Pull them out 1-2 hours before baking to finish rising at room temperature.
-
Storage & Reheating: Store cooled rolls in an airtight container for up to 2 days. To recapture that just-baked warmth and softness, wrap them in foil and warm in a 300°F oven for 10 minutes, or microwave individual rolls for 10-15 seconds.
Serving Suggestions: Beyond the Bread Basket
These garlic bread rolls are ambitious. They won’t be content sitting quietly on the side.
-
The Ultimate Appetizer: Serve a pan of warm rolls with marinara sauce, warmed marinara for dipping, or a creamy ricotta dip.
-
Soup’s Best Friend: Dunk them into a hearty tomato bisque, a creamy potato leek soup, or a rich beef stew.
-
Pasta Night Essential: They are the mandatory tool for scooping up every last bit of Bolognese, Alfredo, or pesto from your plate.
-
Holiday Showstopper: Upgrade your Thanksgiving or Christmas dinner roll offering. They will be the first thing to disappear.
-
Breakfast Brilliance: Split, toast, and top with a poached egg and hollandaise for a decadent twist on eggs Benedict.
Final Thoughts
Mastering the art of garlic bread rolls is more than just following a recipe; it’s about embracing the process of creating something deeply satisfying from simple, wholesome ingredients. The journey—from the aroma of garlic sizzling in butter, to the quiet magic of the rise, to the final presentation of a gleaming pan of golden, fragrant rolls—is as rewarding as the first, warm, buttery bite. These rolls have the power to transform an ordinary weeknight dinner into a special occasion and to make guests feel truly cherished. They are a testament to the fact that the best foods are often the ones made with care and shared with others. So, preheat your oven, mince that garlic, and get ready to bake. Your new favorite culinary staple—the perfect, soft, irresistibly garlicky homemade garlic bread roll—awaits.