The Ultimate Guide to Irresistibly Crispy Baked Chicken Tenders: A Healthier Family Favorite
There’s a universal truth in the world of food: everyone loves chicken tenders. They are the quintessential comfort food, the reliable kid-pleaser, and the ultimate party snack. But let’s be honest, the deep-fried version, while delicious, often comes with a side of guilt. What if you could achieve that satisfying, golden-brown crunch without the vat of oil? What if the perfect weeknight dinner was both incredibly easy and undeniably good for you?
Enter the hero of your kitchen: the Crispy Baked Chicken Tenders.
More breakfast ideas you’ll love
This isn’t just a “healthier alternative”; this is a recipe that stands on its own as a culinary triumph. We’re talking about tender, juicy strips of chicken encased in a shatteringly crisp, flavorful coating, all achieved in your oven. This post is your definitive guide to mastering this dish. We’ll dive deep into the recipe, explore the science behind the crisp, and unlock a world of variations and serving suggestions. Get ready to fall in love with Crispy Baked Chicken Tenders all over again.
Why You’ll Never Go Back to Fried
Before we preheat the oven, let’s talk about why this method is a game-changer.
-
Healthier Profile: By baking, you significantly reduce the amount of fat and calories compared to traditional deep-frying. A quick spritz of olive oil spray is all you need to achieve that beautiful golden color and texture.
-
Lighter Feel: Fried foods can feel heavy and greasy. These Crispy Baked Chicken Tenders are satisfying without weighing you down, leaving you feeling energized after your meal.
-
Easy Cleanup: No splattered stovetop, no disposing of used cooking oil. A single baking sheet (especially if lined with parchment paper) makes cleanup an absolute breeze.
-
Consistent Results: Frying can be tricky—oil temperature fluctuations can lead to burnt exteriors and raw interiors. Baking provides a gentle, even heat that cooks the chicken perfectly every time.
-
Meal Prep Champion: These tenders reheat remarkably well, making them a fantastic option for weekly meal prep for lunches, quick dinners, or high-protein snacks.
The Anatomy of the Perfect Crispy Baked Chicken Tender
Creating the perfect tender is a simple process, but each step holds the key to maximizing flavor and texture. Let’s break down the components.
The Chicken: The Star of the Show
-
Cut: You can start with either full chicken breasts, sliced into 1-inch wide strips, or pre-cut chicken tenders. Tenders are often more tender (hence the name), but breasts are perfectly fine and can be more cost-effective. The key is to cut them into uniform sizes to ensure even cooking.
-
Pat Dry: This is a pro-tip that cannot be overstated. Before you do anything, pat the chicken strips completely dry with paper towels. Moisture is the enemy of crispiness. A dry surface allows the breading to adhere properly and results in a much crispier crust.
-
Seasoning: Don’t just rely on the coating for flavor. Seasoning the chicken itself with a pinch of salt and pepper before breading ensures that every single bite is perfectly seasoned from the inside out.
The Breading Station: The Foundation of Flavor and Crunch
This is where the magic happens. A well-constructed breading station is a three-step process that creates a seamless bond between the chicken and its crispy jacket.
-
The Dry Hand / Wet Hand Method: The secret to a clean and efficient breading process is to use one hand for the wet ingredients (egg) and the other for the dry ingredients (breadcrumb mixture). Your “wet hand” places the chicken in the egg, then transfers it to the breadcrumbs. Your “dry hand” scoops the breadcrumbs over the chicken, presses to adhere, and places it on the baking sheet. This prevents your fingers from becoming a clumpy, breaded mess.
The Coating: Deconstructing the Crunch
The combination of ingredients in your dry mixture is what transforms a simple baked chicken strip into a Crispy Baked Chicken Tender.
-
Panko Breadcrumbs: This is the non-negotiable secret weapon. Panko are Japanese-style breadcrumbs that are coarser, flakier, and airier than traditional fine, sandy breadcrumbs. They don’t absorb as much oil and create a lighter, crispier, and more shattering crust that is far superior for baking. Regular breadcrumbs will work, but they yield a denser, harder coating.
-
Grated Parmesan Cheese (The Flavor Booster): Adding finely grated Parmesan to the panko mixture is a masterstroke. It not only adds a deep, savory, umami flavor, but the cheese also contributes to browning and adds an extra layer of crispness as it melts and toasts in the oven.
-
The Spice Blend: Our blend of garlic powder, paprika, onion powder, salt, and pepper is a classic for a reason. The paprika adds a subtle sweetness and a beautiful color, while the garlic and onion powders provide a foundational savory flavor. Feel free to get creative here—a pinch of cayenne for heat, some dried herbs like oregano or thyme, or even a teaspoon of mustard powder would all be fantastic additions.
The Can’t-Fail Recipe for Crispy Baked Chicken Tenders
This is the detailed, step-by-step guide to achieving perfection. Print it, pin it, and make it a staple in your home.
Crispy Baked Chicken Tenders
Homemade baked chicken tenders are a delicious, healthier alternative to the deep-fried version. This easy recipe features tender, juicy chicken strips coated in a crispy, golden breadcrumb coating.
Perfect for a quick weeknight dinner, meal prepping, or a fun family meal, these chicken tenders are both simple and satisfying.
-
Prep Time: 10 minutes
-
Cook Time: 20 minutes
-
Total Time: 30 minutes
-
Course: Main Course
-
Cuisine: American
-
Servings: 4 Servings
-
Calories: 375 kcal
Ingredients
-
1 lb chicken breasts or chicken tenders, cut into strips
-
2 large eggs, beaten
-
1 cup panko breadcrumbs
-
½ cup grated Parmesan cheese (optional for extra flavor)
-
1 tsp garlic powder
-
1 tsp paprika
-
½ tsp onion powder
-
½ tsp salt
-
¼ tsp black pepper
-
Olive oil spray, for coating
Instructions
-
Prep the Chicken: If using chicken breasts, cut them into uniform strips (about 1-inch wide). Pat the chicken strips completely dry with paper towels. This is a crucial step for crispiness! If using pre-cut chicken tenders, you can skip the cutting but not the drying.
-
Preheat and Prepare the Pan: Preheat your oven to 400°F (200°C). This high heat is essential for creating that initial burst of crispiness. Line a baking sheet with parchment paper or a silicone baking mat for effortless cleanup. For the absolute crispiest results, place a wire rack on top of the baking sheet. The wire rack allows hot air to circulate around the entire tender, preventing the bottom from getting soggy.
-
Prepare the Breading Stations: In one shallow bowl (a pie plate works great), beat the eggs until smooth. In a second shallow bowl, combine the panko breadcrumbs, grated Parmesan cheese, garlic powder, paprika, onion powder, salt, and black pepper. Whisk this mixture with a fork to ensure all the spices are evenly distributed.
-
Season and Bread the Chicken: Season the dried chicken tenders lightly with a pinch of salt and pepper. Now, implement the dry hand/wet hand method. Using one hand (your “wet hand”), dip a chicken strip into the beaten egg, allowing any excess to drip off. Then, transfer it to the breadcrumb mixture. With your other hand (your “dry hand”), scoop the breadcrumbs over the chicken, pressing gently but firmly to ensure the crumbs adhere and form a solid coating. For an extra-thick, crunchier coating, you can double-coat by repeating the egg and breadcrumb process.
-
Arrange and Spray: Place the breaded chicken tenders on the prepared baking sheet or wire rack, leaving a little space between each one for proper air circulation. Once all tenders are arranged, spray them generously with olive oil spray. This mimics the effect of frying, helping the panko brown and become incredibly crisp.
-
Bake to Perfection: Bake for 10-12 minutes, then carefully flip each tender. Spray the second side lightly with olive oil spray. Return to the oven and bake for another 10-13 minutes, or until the coating is a deep golden brown and the chicken is cooked through. The internal temperature should read 165°F (74°C) on an instant-read thermometer.
-
Serve and Enjoy: Remove the Crispy Baked Chicken Tenders from the oven and let them rest on the pan for 2-3 minutes. This allows the juices to redistribute throughout the chicken, ensuring they stay moist. Serve immediately with your favorite dipping sauces!
Elevating Your Tenders: Dipping Sauces and Serving Ideas
A Crispy Baked Chicken Tender is a blank canvas for a world of flavors.
Classic Dipping Sauces:
-
Honey Mustard: The perfect balance of sweet and tangy.
-
BBQ Sauce: A smoky, classic pairing.
-
Ranch Dressing: An undeniable crowd-pleaser.
-
Sriracha Mayo: For those who like a creamy, spicy kick.
Gourmet Twists:
-
Copycat Chick-fil-A Sauce: Mix mayo, mustard, honey, BBQ sauce, and a touch of lemon juice.
-
Avocado Cilantro Lime Crema: Blend an avocado with Greek yogurt, lime juice, cilantro, and salt for a creamy, zesty dip.
-
Sweet Chili Sauce: The Thai-inspired sweet and mild heat is a fantastic contrast.
How to Serve Your Crispy Baked Chicken Tenders for a Complete Meal:
-
The Classic Dinner Plate: Serve alongside creamy mac and cheese and steamed green beans or broccoli.
-
The Ultimate Salad Topper: Slice them and place them on top of a fresh garden salad for a protein-packed lunch. Caesar salad is a natural fit.
-
Wrap or Sandwich Style: Tuck a few tenders into a soft wrap or bun with lettuce, tomato, and your favorite sauce for a next-level chicken sandwich.
-
Appetizer or Game-Day Spread: Arrange a big platter of tenders with an assortment of dipping sauces. They will disappear in minutes.
The Ultimate Guide to Irresistibly Crispy Baked Chicken Tenders: A Healthier Family Favorite
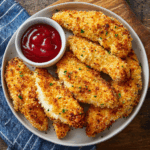
Homemade baked chicken tenders are a healthier, just-as-delicious alternative to the deep-fried version. Tender, juicy chicken strips are coated in a golden, crispy breadcrumb crust, making them perfect for weeknight dinners, meal prepping, or a fun family meal. They’re simple, satisfying, and sure to be a hit with everyone!
Ingredients
-
1 lb chicken breasts or chicken tenders, cut into strips
-
2 large eggs, beaten
-
1 cup panko breadcrumbs (or regular breadcrumbs)
-
½ cup grated Parmesan cheese (optional, for extra flavor)
-
1 tsp garlic powder
-
1 tsp paprika
-
½ tsp onion powder
-
½ tsp salt
-
¼ tsp black pepper
-
Olive oil spray, for coating
Instructions
-
Prep the Chicken:
If using chicken breasts, cut them into 1-inch wide strips. Skip this step if using chicken tenders. -
Prepare the Breading Stations:
-
In one bowl, beat the eggs until smooth.
-
In another bowl, mix panko breadcrumbs, Parmesan cheese (if using), garlic powder, paprika, onion powder, salt, and black pepper.
-
-
Season the Chicken:
Lightly season the chicken strips with salt and pepper. -
Bread the Chicken:
-
Dip each strip into the beaten eggs, letting excess drip off.
-
Coat in the breadcrumb mixture, pressing lightly to adhere.
-
For extra crunch, repeat the egg and breadcrumb coating (double coat).
-
-
Prepare the Baking Sheet:
Line a baking sheet with parchment paper or a silicone baking mat.
If available, place a wire rack on top to allow air circulation for crispier tenders. -
Arrange and Bake:
-
Place the breaded chicken strips on the sheet/rack, leaving space between them.
-
Preheat the oven to 400°F (200°C).
-
Lightly spray the chicken with olive oil.
-
Bake 20–25 minutes, flipping halfway, until golden brown and crispy.
-
Ensure the internal temperature reaches 165°F (74°C).
-
-
Serve and Enjoy:
Let the tenders rest for a few minutes, then serve with dipping sauces like honey mustard, BBQ sauce, or ranch.
Notes
-
Make it extra crunchy: Use panko breadcrumbs and double coat the chicken.
-
Add flavor: Mix dried herbs like oregano or thyme into the breadcrumb mixture.
-
Meal prep: Store cooked tenders in the fridge for up to 3 days. Reheat in the oven or air fryer for best texture.
Final Thoughts on Crispy Baked Chicken Tenders
In the quest for a meal that is simultaneously wholesome, delicious, and universally adored, it’s hard to beat the humble chicken tender. And by mastering the art of the Crispy Baked Chicken Tender, you unlock a recipe that is more than the sum of its parts. It’s a testament to the fact that you don’t have to sacrifice flavor or texture for the sake of health.
This recipe provides a foundation that is both reliable and incredibly adaptable. Once you’ve perfected the basic technique, a world of customization opens up. Change the spices to create a Buffalo-style coating, use crushed cornflakes for a different kind of crunch, or mix in some almond flour for a lower-carb option. These Crispy Baked Chicken Tenders are forgiving, fast, and consistently rewarding.
They prove that the best family meals don’t have to be complicated or time-consuming. In just about 30 minutes, you can create a dish that will have everyone asking for seconds, a dish that feels like a treat but is nourishing enough to serve any day of the week. So, preheat that oven, grab your panko, and get ready to bake your way to chicken tender perfection. Your new go-to dinner has officially arrived.