The Ultimate Guide to Perfectly Crispy Baked Chicken Tenders: A Healthier Family Favorite
There’s a universal truth in the world of food: everyone loves chicken tenders. They are the quintessential comfort food, the fail-safe kid-pleaser, and the ultimate party snack. But let’s be honest, the deep-fried version, while undeniably delicious, often leaves us feeling a bit heavy with guilt. What if you could achieve that satisfying, golden-brown crunch without the vat of oil? What if the holy grail of weeknight dinners was not only easier to make but also better for you?
Enter the hero of our kitchen: the Crispy Baked Chicken Tenders.
More breakfast ideas you’ll love
This isn’t just a “healthier alternative” you tolerate; this is a recipe that stands on its own as a culinary triumph. We’re talking about tender, juicy strips of chicken enveloped in a shatteringly crisp, perfectly seasoned coating, all achieved in your oven. This post is your definitive guide to mastering this beloved dish. We’ll dive deep into the recipe, explore the science behind the crisp, and provide endless variations to keep your meal rotation exciting. So, preheat your oven and get ready to fall in love with Crispy Baked Chicken Tenders all over again.
Why You Need This Recipe in Your Life
Before we get to the how, let’s talk about the why. This recipe for Crispy Baked Chicken Tenders is more than just a list of ingredients and steps; it’s a gateway to stress-free, delicious, and wholesome eating.
-
A Healthier Choice: By baking instead of frying, you significantly cut down on calories and unhealthy fats. A serving of these tenders contains a fraction of the oil used in their deep-fried counterparts, making them a choice you can feel good about.
-
Weeknight Warrior: With a total time of just 30 minutes from prep to plate, this recipe is a lifesaver on busy evenings. It’s simple enough for novice cooks and fast enough to prevent the dreaded “hangry” meltdown.
-
Meal Prep Marvel: Crispy Baked Chicken Tenders are fantastic for meal prepping. Cook a large batch on Sunday, and you have a ready-to-go protein for salads, wraps, pasta dishes, and lunchboxes throughout the week.
-
Family-Friendly & Crowd-Pleasing: It’s a rare recipe that appeals equally to toddlers, teenagers, and adults. Serve them with a variety of dipping sauces, and you have a meal that makes everyone at the table happy.
-
Incredibly Versatile: The base recipe is a blank canvas. As you’ll see later, you can customize the seasoning and coating to take your taste buds on a world tour, from spicy Buffalo to herbaceous Italian.
The Blueprint for Perfect Crispy Baked Chicken Tenders
This recipe is designed for reliability and maximum crispiness. Let’s break down the ingredients and the method to understand why each component and step is crucial.
Gathering Your Arsenal: The Ingredients
The Chicken:
-
1 lb chicken breasts or chicken tenders, cut into strips. Using pre-cut tenders saves time, but chicken breasts work perfectly. The key is to cut them into uniform, 1-inch wide strips to ensure even cooking. No one wants a mix of dry and undercooked chicken!
The Breading Station Trio:
The three-bowl method is non-negotiable for the perfect crust. This is where the magic happens for our Crispy Baked Chicken Tenders.
-
The Binder: 2 large eggs, beaten. The egg acts as the glue that holds the crispy coating to the chicken. Beating them until smooth is essential for an even, thin layer that doesn’t slide off during baking.
-
The Crisp-Makers:
-
1 cup panko breadcrumbs. This is the secret weapon. Panko is a Japanese-style breadcrumb that is coarser and airier than traditional fine breadcrumbs. This structure creates more surface area, which leads to a lighter, crunchier, and less greasy coating. Do not substitute if you can help it!
-
½ cup grated Parmesan cheese (optional). I say “optional,” but I highly recommend it. Parmesan adds a deep, savory, umami flavor and, because of its low moisture content, it helps the coating become even crispier as it bakes.
-
The Flavor Brigade: The Seasonings
-
1 tsp garlic powder
-
1 tsp paprika (adds a subtle sweetness and beautiful color)
-
½ tsp onion powder
-
½ tsp salt
-
¼ tsp black pepper
This blend is a classic for a reason, but don’t be afraid to make it your own. We’ll explore variations later.
The Finishing Touch:
-
Olive oil spray. This is the final, critical step for achieving that golden-brown, fried-like texture. A light spritz of oil helps the panko brown beautifully and crisp up in the dry heat of the oven.
The Step-by-Step Method to Crispy Perfection
Follow these steps carefully, and you will be rewarded with the best Crispy Baked Chicken Tenders of your life.
Step 1: Prep the Chicken
If you’re using chicken breasts, pat them dry with a paper towel and slice them into even strips. Season lightly with a pinch of salt and pepper. This initial seasoning ensures the chicken itself is flavorful, not just the coating.
Step 2: Set Up Your Breading Assembly Line
Organization is key here. You need three separate stations in a row: 1) your plate of seasoned chicken, 2) a shallow bowl with the beaten eggs, and 3) a shallow bowl with the panko, Parmesan, and all the seasonings mixed together. This “wet hand, dry hand” assembly line prevents your fingers from becoming a clumpy mess.
Step 3: The Art of Breading
Using one hand, pick up a chicken strip and dip it fully into the egg wash. Let the excess drip off. Then, with your other hand, place the strip into the panko mixture. Scoop the crumbs over the top and press down firmly. This pressing action is what ensures the coating adheres properly and creates a substantial, crunchy crust. Don’t just toss it in lightly; give it a good press!
Pro-Tip for Extra Crunch: For an even thicker, crunchier coating, perform a double-dip. After the first coat of breadcrumbs, dip the tender back into the egg and then into the panko mixture a second time. This is the secret to an extra-craggy, super-crispy exterior.
Step 4: Prepare the Baking Sheet for Maximum Crispiness
This might be the most important step for texture. Do not just place the tenders on a bare baking sheet. For the crispiest results, place a wire rack on top of a baking sheet lined with parchment paper (for easy cleanup). Arranging the Crispy Baked Chicken Tenders on the wire rack allows hot air to circulate around the entire tender, cooking it evenly and preventing the bottom from getting soggy. If you don’t have a wire rack, a parchment-lined sheet will work, but be sure to flip them halfway through.
Step 5: The Final Touch Before Baking
Arrange the breaded tenders on the rack, leaving a little space between each one. Now, take your olive oil spray and give them a generous, even mist. This will make the panko toast and brown, mimicking the effect of frying.
Step 6: Bake to Golden-Brown Perfection
Bake in a preheated oven at 400°F (200°C) for 20-25 minutes. The high heat is crucial for creating that initial burst of crispiness. Remember to flip them halfway through the cooking time to ensure even browning on both sides. The tenders are done when they are a deep golden brown and firm to the touch.
Step 7: The Most Important (and Often Skipped) Step: Rest!
As soon as you pull those gorgeous, golden Crispy Baked Chicken Tenders from the oven, resist the urge to bite into one immediately! Let them rest on the rack for 3-5 minutes. This allows the juices in the chicken to redistribute, ensuring every bite is moist and tender, and gives the coating a final chance to firm up into its ultimate crispy state.
Beyond the Basic: Endless Variations for Your Crispy Baked Chicken Tenders
Once you’ve mastered the classic, the world is your oyster! Here are some ways to customize your tenders:
-
Spicy Buffalo Style: Add 2 tablespoons of hot sauce to the egg wash and 1 teaspoon of cayenne pepper to the panko mixture. After baking, toss them in a mix of melted butter and Frank’s RedHot sauce.
-
Herbaceous Italian: Replace the paprika with 2 teaspoons of Italian seasoning and add 2 tablespoons of finely chopped fresh parsley to the panko.
-
Savory Ranch: Add 2 tablespoons of dry ranch seasoning mix to the panko breadcrumbs. It’s an instant flavor bomb.
-
“Everything Bagel” Crust: Replace the panko mixture with a blend of 1 cup panko and ¼ cup Everything Bagel Seasoning. Unbelievably good.
-
Gluten-Free Option: Use gluten-free panko breadcrumbs. The method remains exactly the same.
Serving Your Masterpiece: It’s Dipping Time!
The perfect Crispy Baked Chicken Tenders deserve the perfect dip. Here are some classic and creative pairings:
-
Classic Honey Mustard: Mix equal parts Dijon mustard and honey, with a splash of mayonnaise for creaminess.
-
Creamy Ranch: A timeless pairing that never fails.
-
Smoky BBQ Sauce: For a sweet and tangy kick.
-
Zesty Marinara: Like a deconstructed, healthier chicken Parmesan.
-
Spicy Sriracha Mayo: Mix sriracha with mayonnaise and a squeeze of lime juice.
But don’t stop at dips! Use these tenders to create incredible meals:
-
On a Salad: Slice them and place them on a bed of fresh greens for a protein-packed salad.
-
In a Wrap: Tuck them into a tortilla with lettuce, tomato, and your favorite sauce.
-
As a Pasta Topper: Slice them and serve over pasta with marinara sauce or alfredo.
-
For a Bento Box: They are the perfect cold or hot lunchbox item for kids and adults alike.
The Ultimate Guide to Perfectly Crispy Baked Chicken Tenders: A Healthier Family Favorite
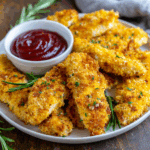
These Crispy Baked Chicken Tenders are everything you love about the classic comfort food — golden, crunchy, and flavorful — but baked instead of fried!
Perfect for busy weeknights, meal prepping, or family dinners, these tenders are easy to make, packed with protein, and so satisfying. Serve them with your favorite dipping sauces for a meal everyone will enjoy.
Ingredients
-
1 lb chicken breasts or chicken tenders, cut into 1-inch strips
-
2 large eggs, beaten
-
1 cup panko breadcrumbs (or regular breadcrumbs)
-
½ cup grated Parmesan cheese (optional, for extra flavor)
-
1 teaspoon garlic powder
-
1 teaspoon paprika
-
½ teaspoon onion powder
-
½ teaspoon salt
-
¼ teaspoon black pepper
-
Olive oil spray, for coating
Instructions
1. Prep the Chicken
If using chicken breasts, cut into strips (about 1 inch wide). Pat dry with paper towels.
2. Prepare the Breading Stations
-
In one bowl: beat the eggs until smooth.
-
In another bowl: mix breadcrumbs, Parmesan (if using), garlic powder, paprika, onion powder, salt, and pepper.
3. Bread the Chicken
Season chicken lightly with salt and pepper.
Dip each piece into the beaten egg, letting the excess drip off, then coat in the breadcrumb mixture.
Press gently so the coating sticks.
(Optional: for extra crunch, double dip in egg and breadcrumbs.)
4. Prepare the Baking Sheet
Line a baking sheet with parchment paper or a silicone mat.
For best results, place a wire rack on top to allow air circulation and extra crispiness.
5. Bake the Chicken
Preheat oven to 400°F (200°C).
Arrange chicken tenders on the baking sheet, leaving space between them.
Spray lightly with olive oil spray.
Bake for 20–25 minutes, flipping halfway through, until golden brown and crispy.
Check that the internal temperature reaches 165°F (74°C).
6. Serve and Enjoy
Let cool for 2–3 minutes before serving.
Enjoy with your favorite dipping sauces — honey mustard, BBQ, or ranch are all delicious choices!
Notes
-
Crispier coating: Use panko breadcrumbs and a wire rack for the best crunch.
-
Air fryer option: Cook at 375°F (190°C) for 10–12 minutes, flipping halfway through.
-
Make ahead: Bread the tenders in advance and refrigerate for up to 6 hours before baking.
-
Freezer-friendly: Freeze cooked tenders for up to 3 months and reheat at 400°F for 10–12 minutes.
Nutrition
- Calories: 375 kcal per serving
- Fat: 14 g
- Protein: 38 g
Final Thoughts on Crispy Baked Chicken Tenders
In a world of complicated recipes and fleeting food trends, it’s the simple, reliable classics that truly earn a permanent spot in our culinary repertoire. This recipe for Crispy Baked Chicken Tenders is more than just a method for cooking chicken; it’s a testament to the fact that you don’t have to sacrifice flavor or texture for health. It proves that with a little technique and understanding, you can create a dish that is objectively better than its less-healthy inspiration.
The journey to perfecting this dish teaches us valuable kitchen lessons: the importance of a well-organized mise en place, the transformative power of high heat and air circulation, and the critical role of resting your meat. These principles apply far beyond this single recipe, making you a more confident and skilled cook overall.
So, the next time a craving for something crispy, savory, and deeply satisfying hits, you know exactly what to do. Skip the takeout menu and the deep fryer. Embrace the simplicity and brilliance of your own oven. Whip up a batch of these golden, juicy, and irresistibly Crispy Baked Chicken Tenders. Your taste buds—and your body—will thank you.